Generate Some Simple Screens with Vaizr
This is a tutorial for non-technical users who are interested in learning more about Vaizr. By following these steps, you’ll learn fundamental Vaizr features while working through some simple tasks.
Depending on how you got here, you may or may not have already downloaded vaizrdemobox for your platform and installed it. Got Vaizrdemobox?
If you haven’t yet downloaded vaizrdemobox for your platform or installed it, go to Get vaizrdemobox.
In this tutorial we generate screens based on two tables. One table for activities and one for impedements. After the creation of the two tables we are going to generate the screens:
The following 9 steps are described in detail below
- Start and activate IntelliJ (one time only)
- Create the two tables. (scripts are prepared)
- Generate Meta Data
- Generate application files
- Copy generated application files (to proper directories)
- Build and deploy to tomcat
- Copy generated menu part into application menu
- Add permissions for new menu
- Check the result
Start and activate IntelliJ
First we start IntelliJ. Intellij is the Integrated Development Environment (IDE). Of course you are free to use whichever IDE you prefer like Eclipse or NetBeans.
- host $
. ./intellij - guest $
intellij
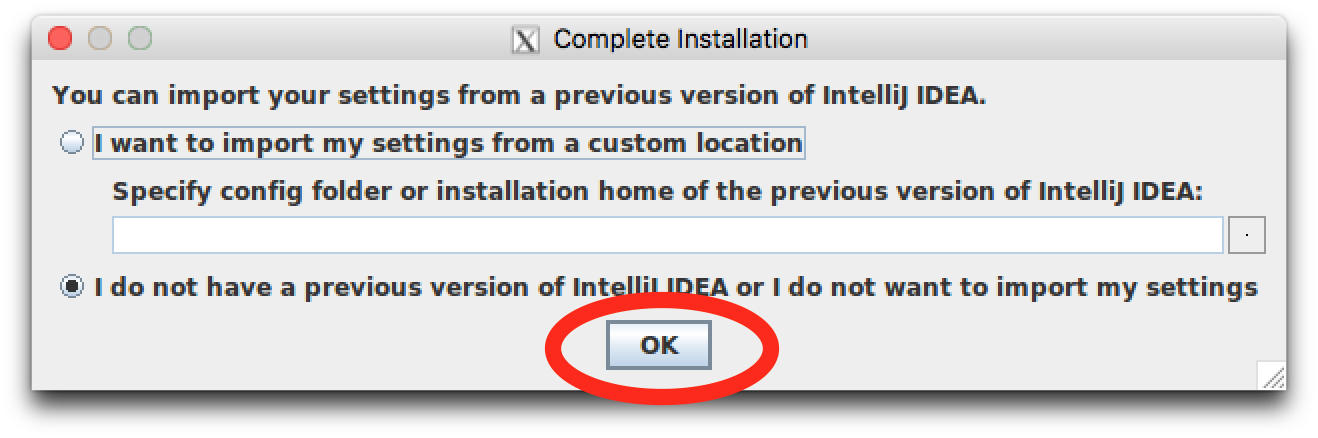
In the intellij_complete_installation click OK
 In the JetBrains Privacy Policy click
 Accept
 In the Set The UI theme click
 Skip All and Set Defaults
 You will see the IntelliJ StartUp Screen for a few seconds
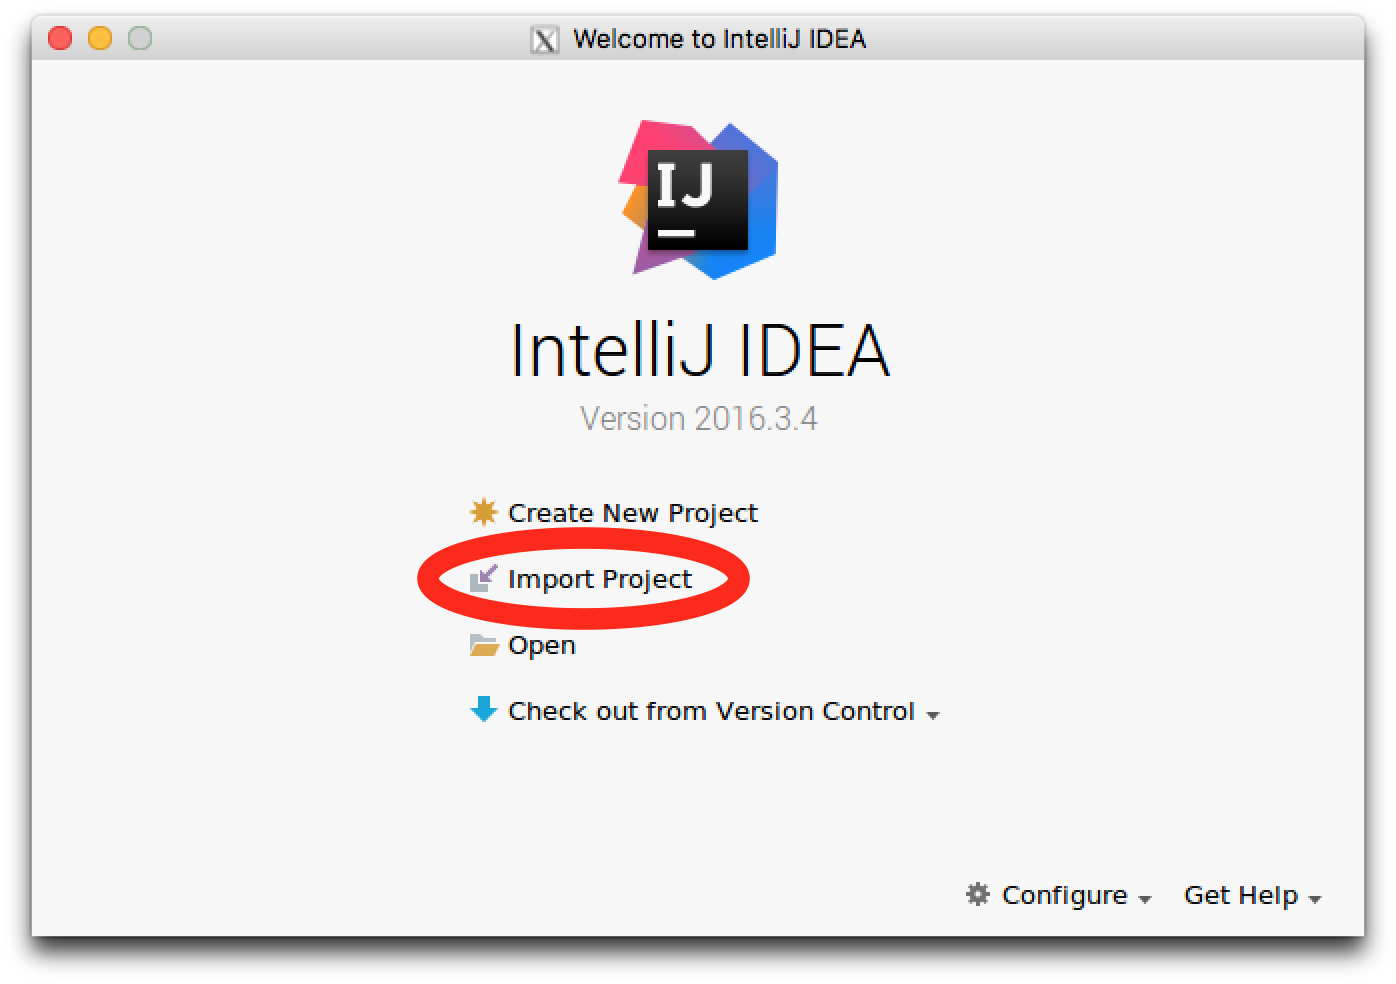 In the IntelliJ IDEA welcome screen click
 Import Project
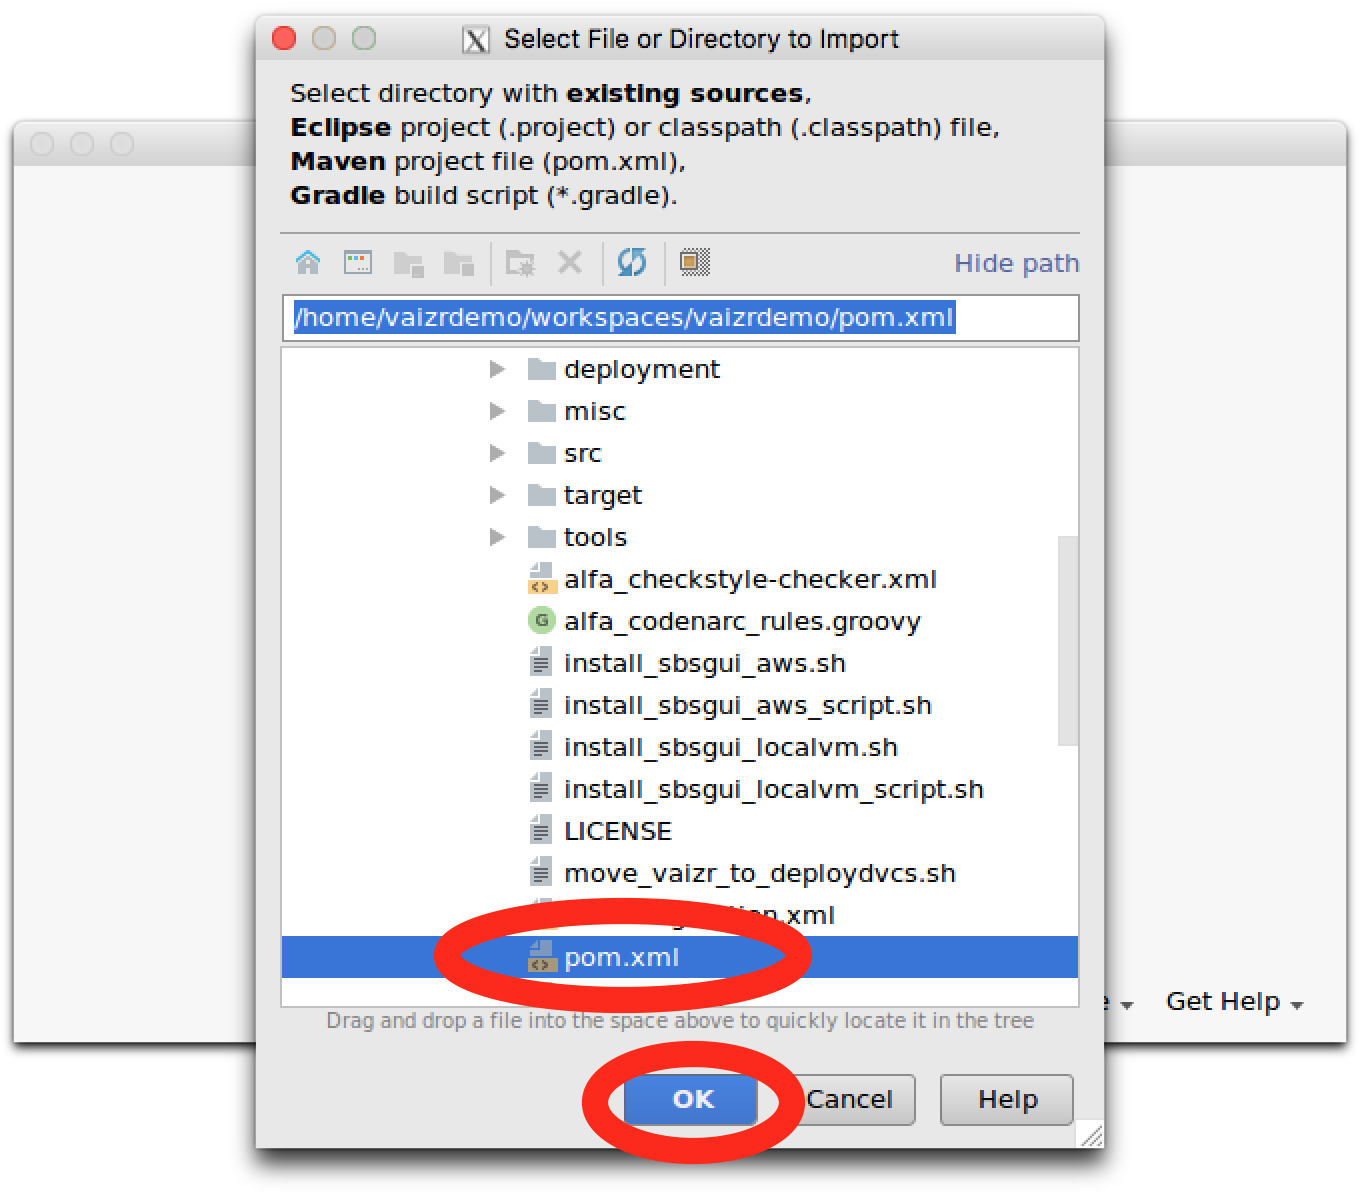 In the Select directory with Maven pom file Select the following file
/home/vaizrdemo/workspaces/vaizrdemo/pom.xml
Double-Click or Click OK
 In the Import Project from Maven Click
 Next
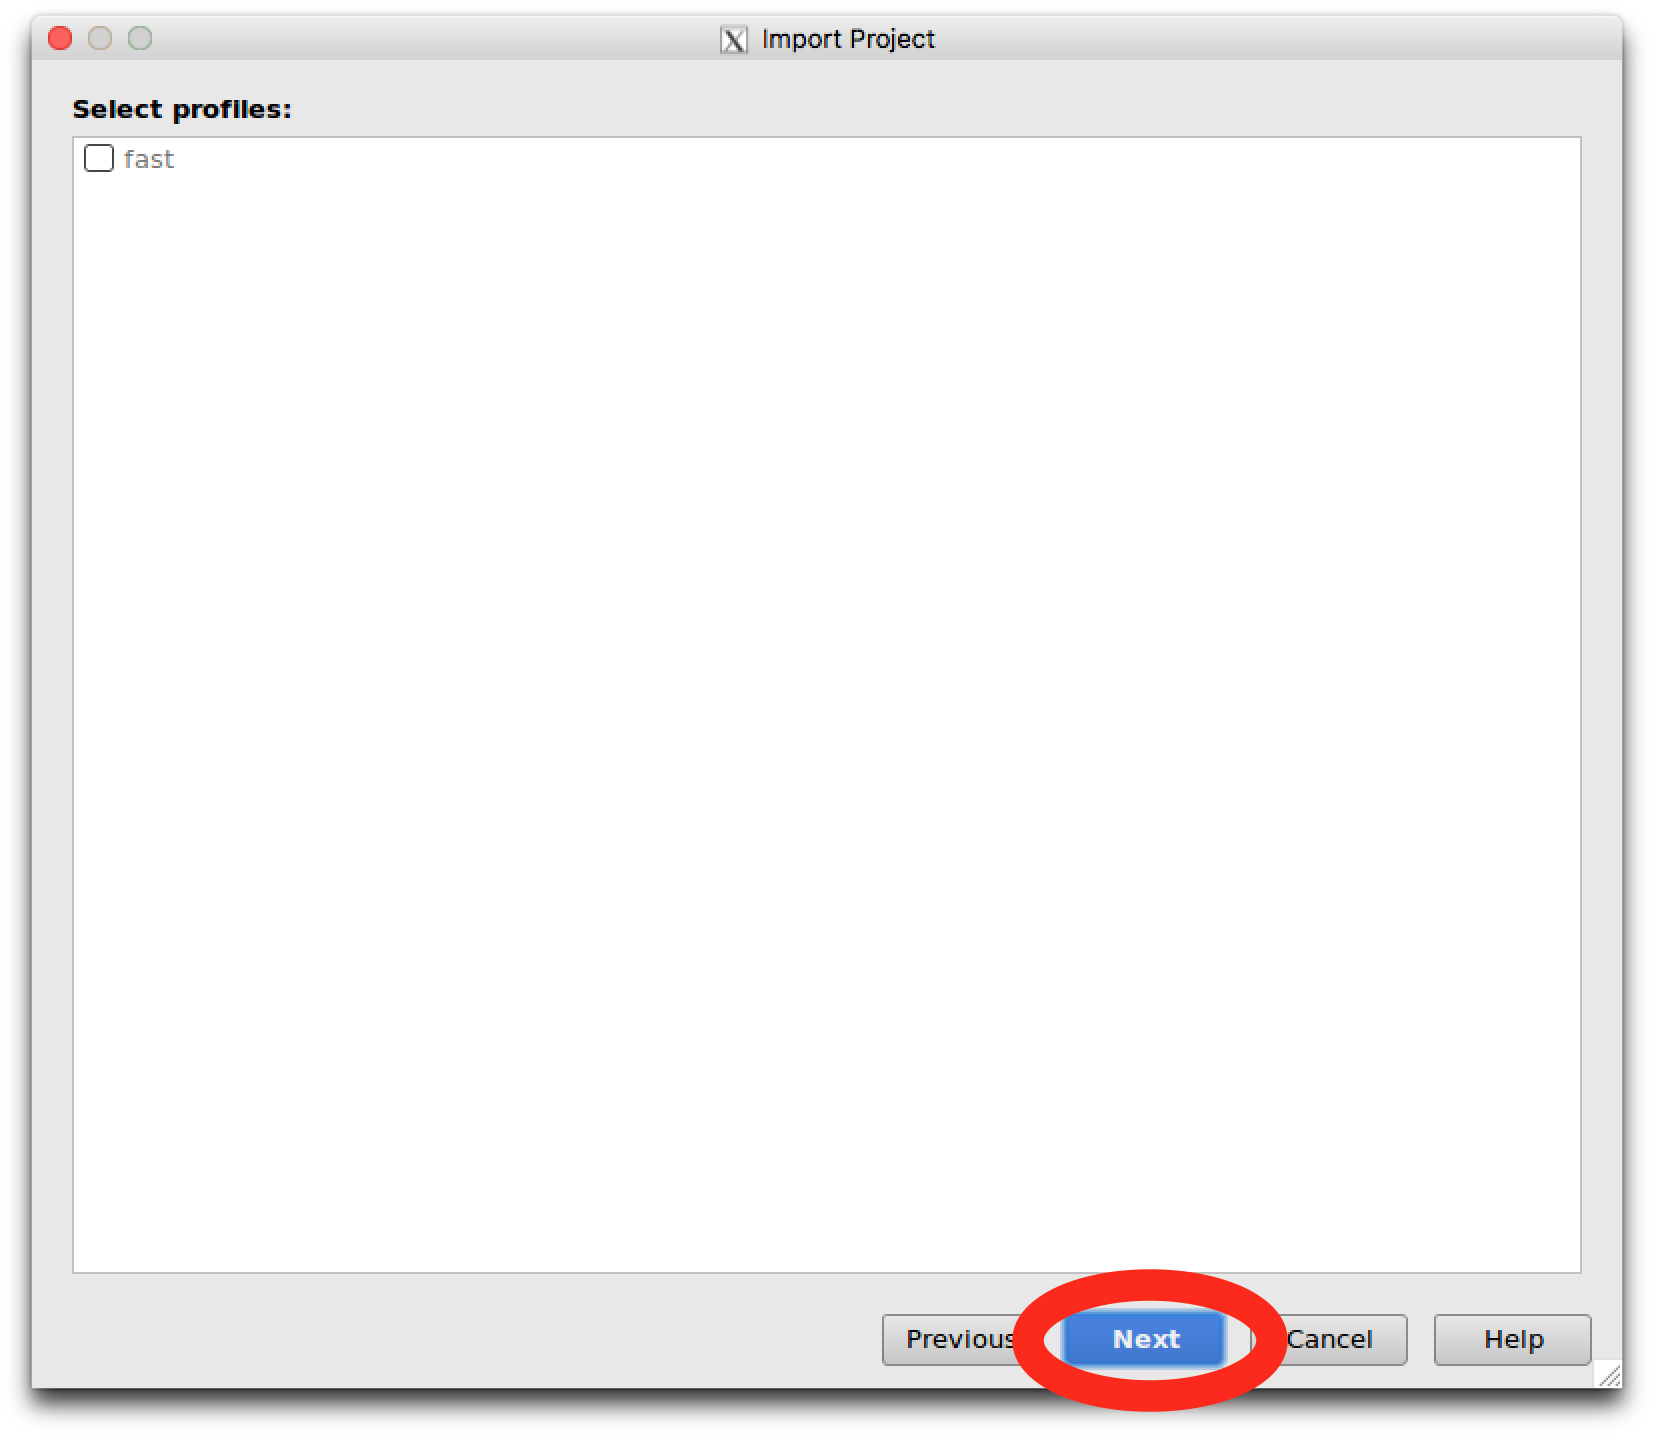 In the Select Profiles Click
 Next
 In the Select Maven Projects to Import Click
 Next
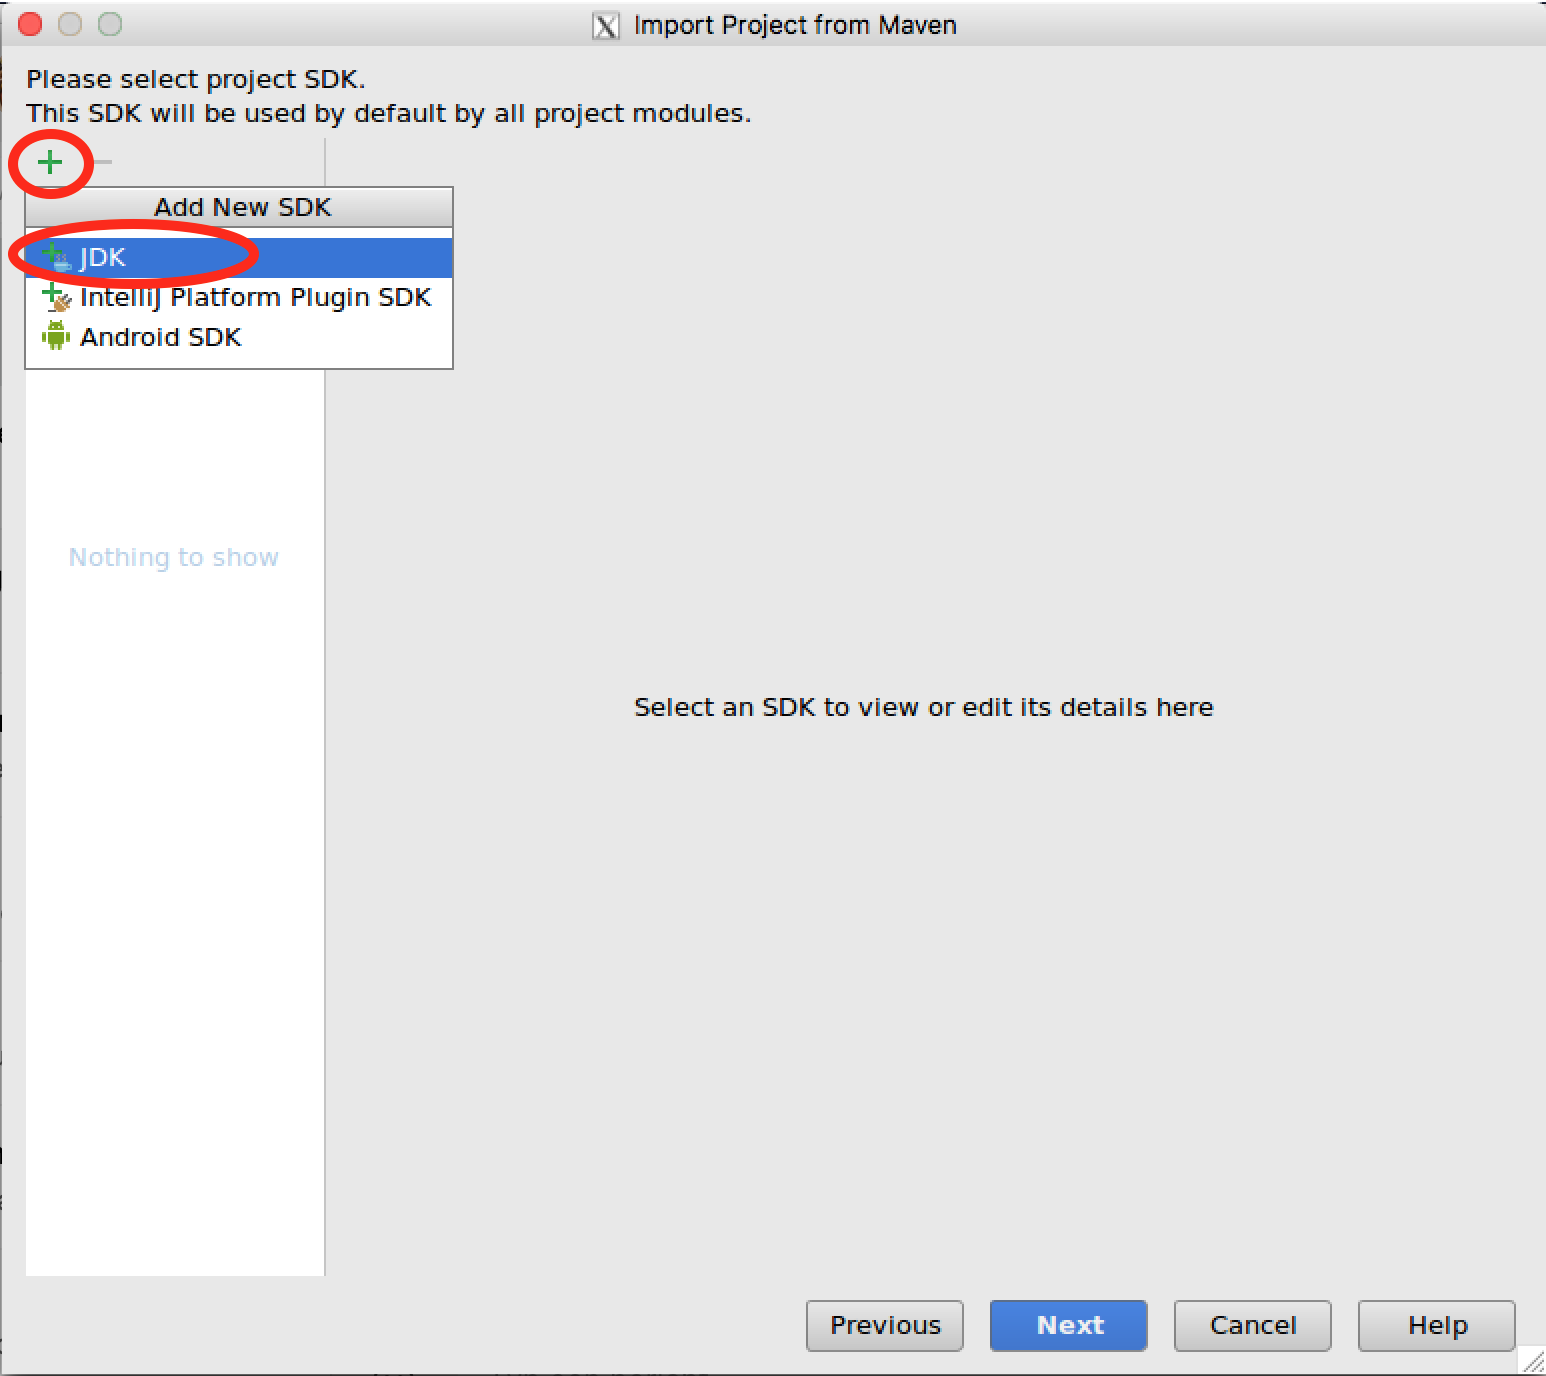 In the Please select project JDK you have to execute the following steps
1. Click on + the green plus sign in the left upper corner
2. Click on JDK
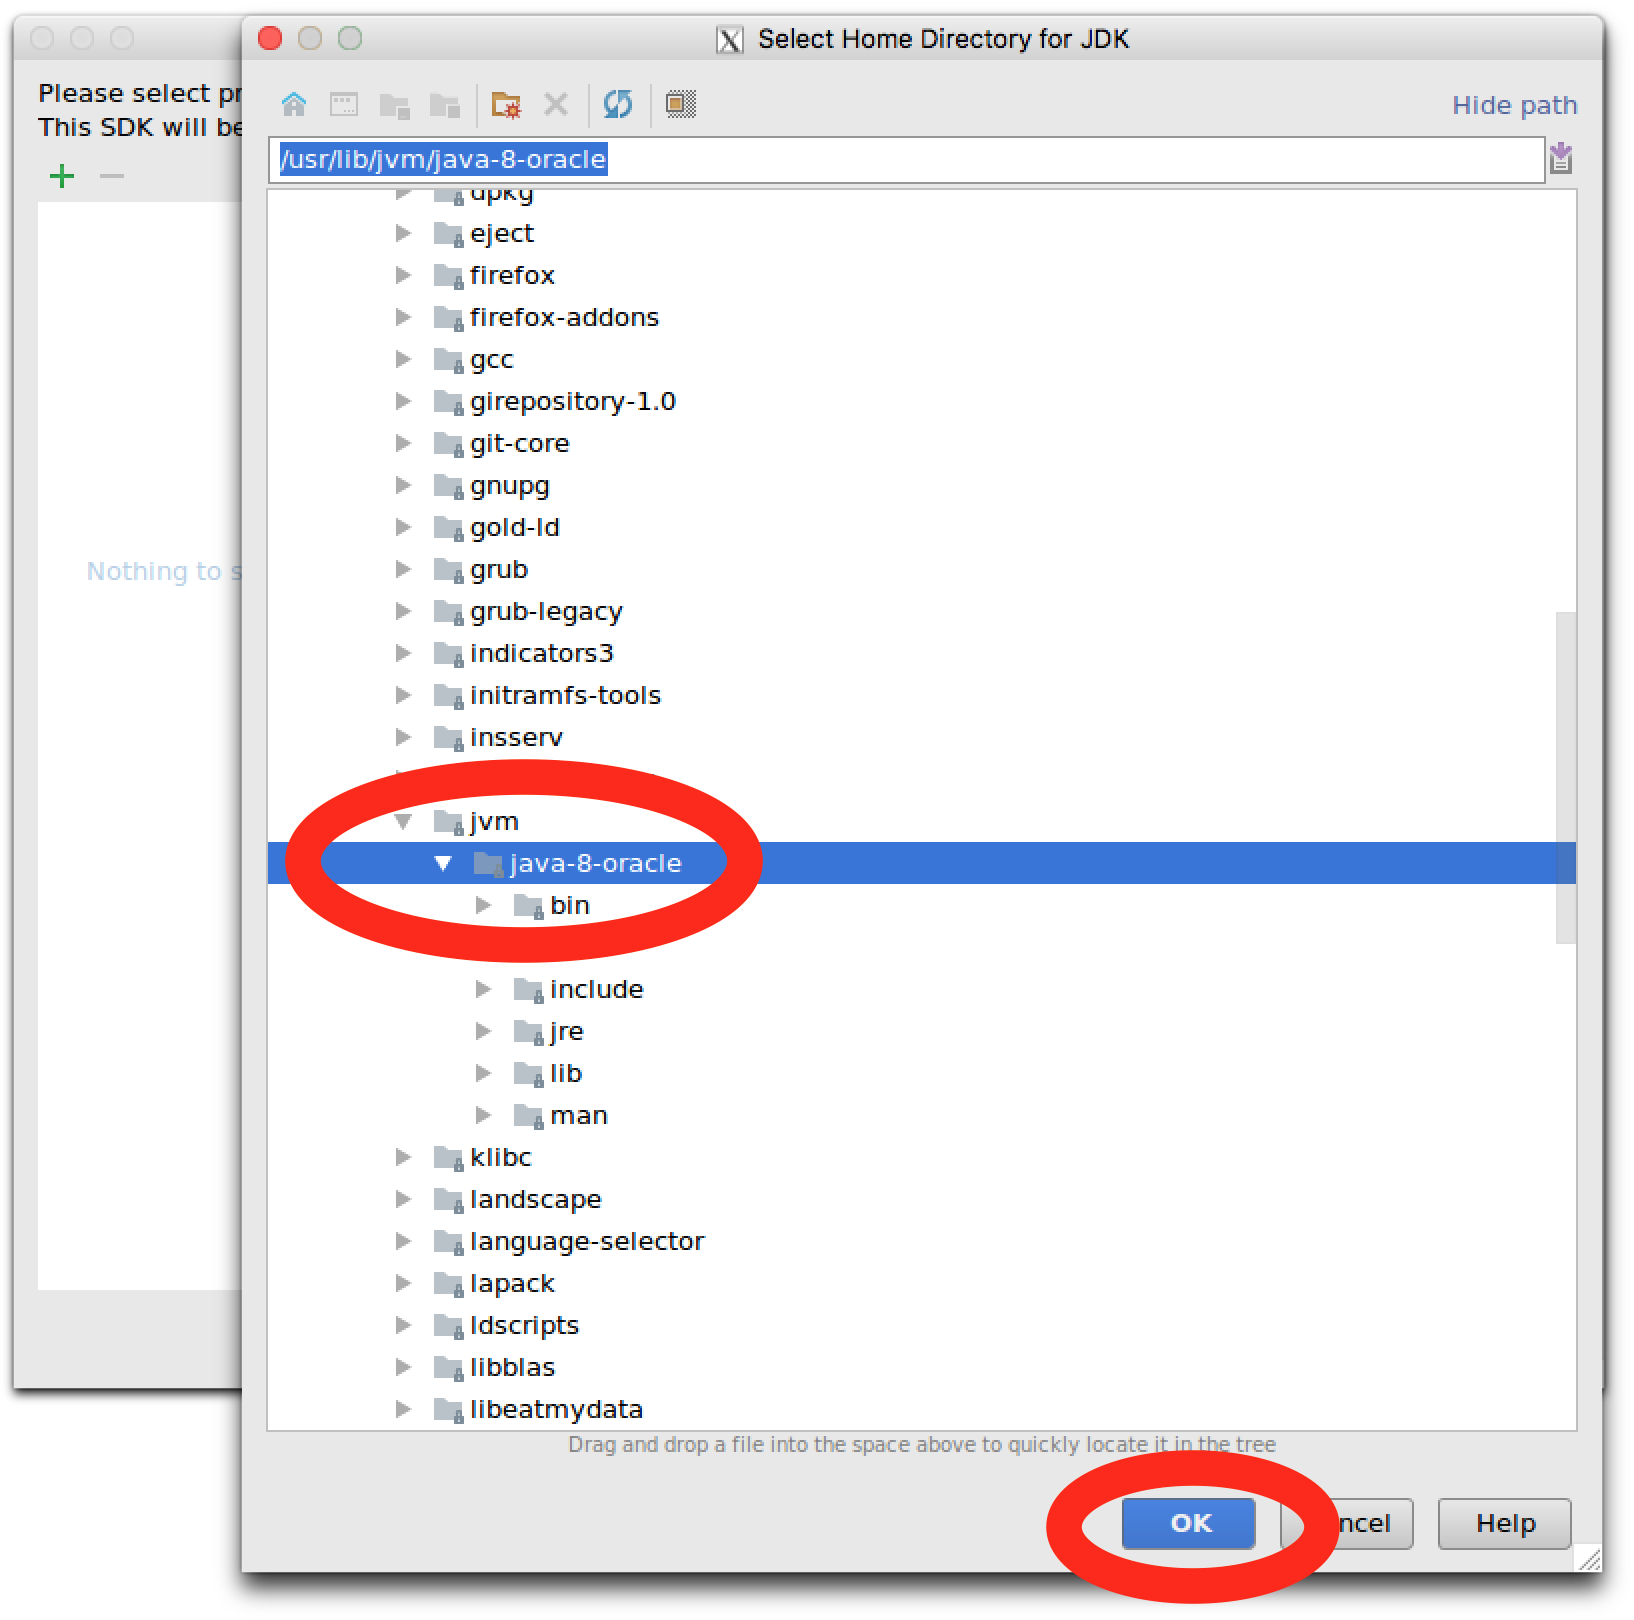 3. Double-click on the jvm folder, this folder should open now
4. In the open jvm folder select the first sub folder
5. This is the java-8-oracle folder
6. In the top field you should see the following selection /usr/lib/jvm/java-8-0racle
7. At the bottom of Select Home Directory for JDK Click OK
 In the Import Project Click
 Next
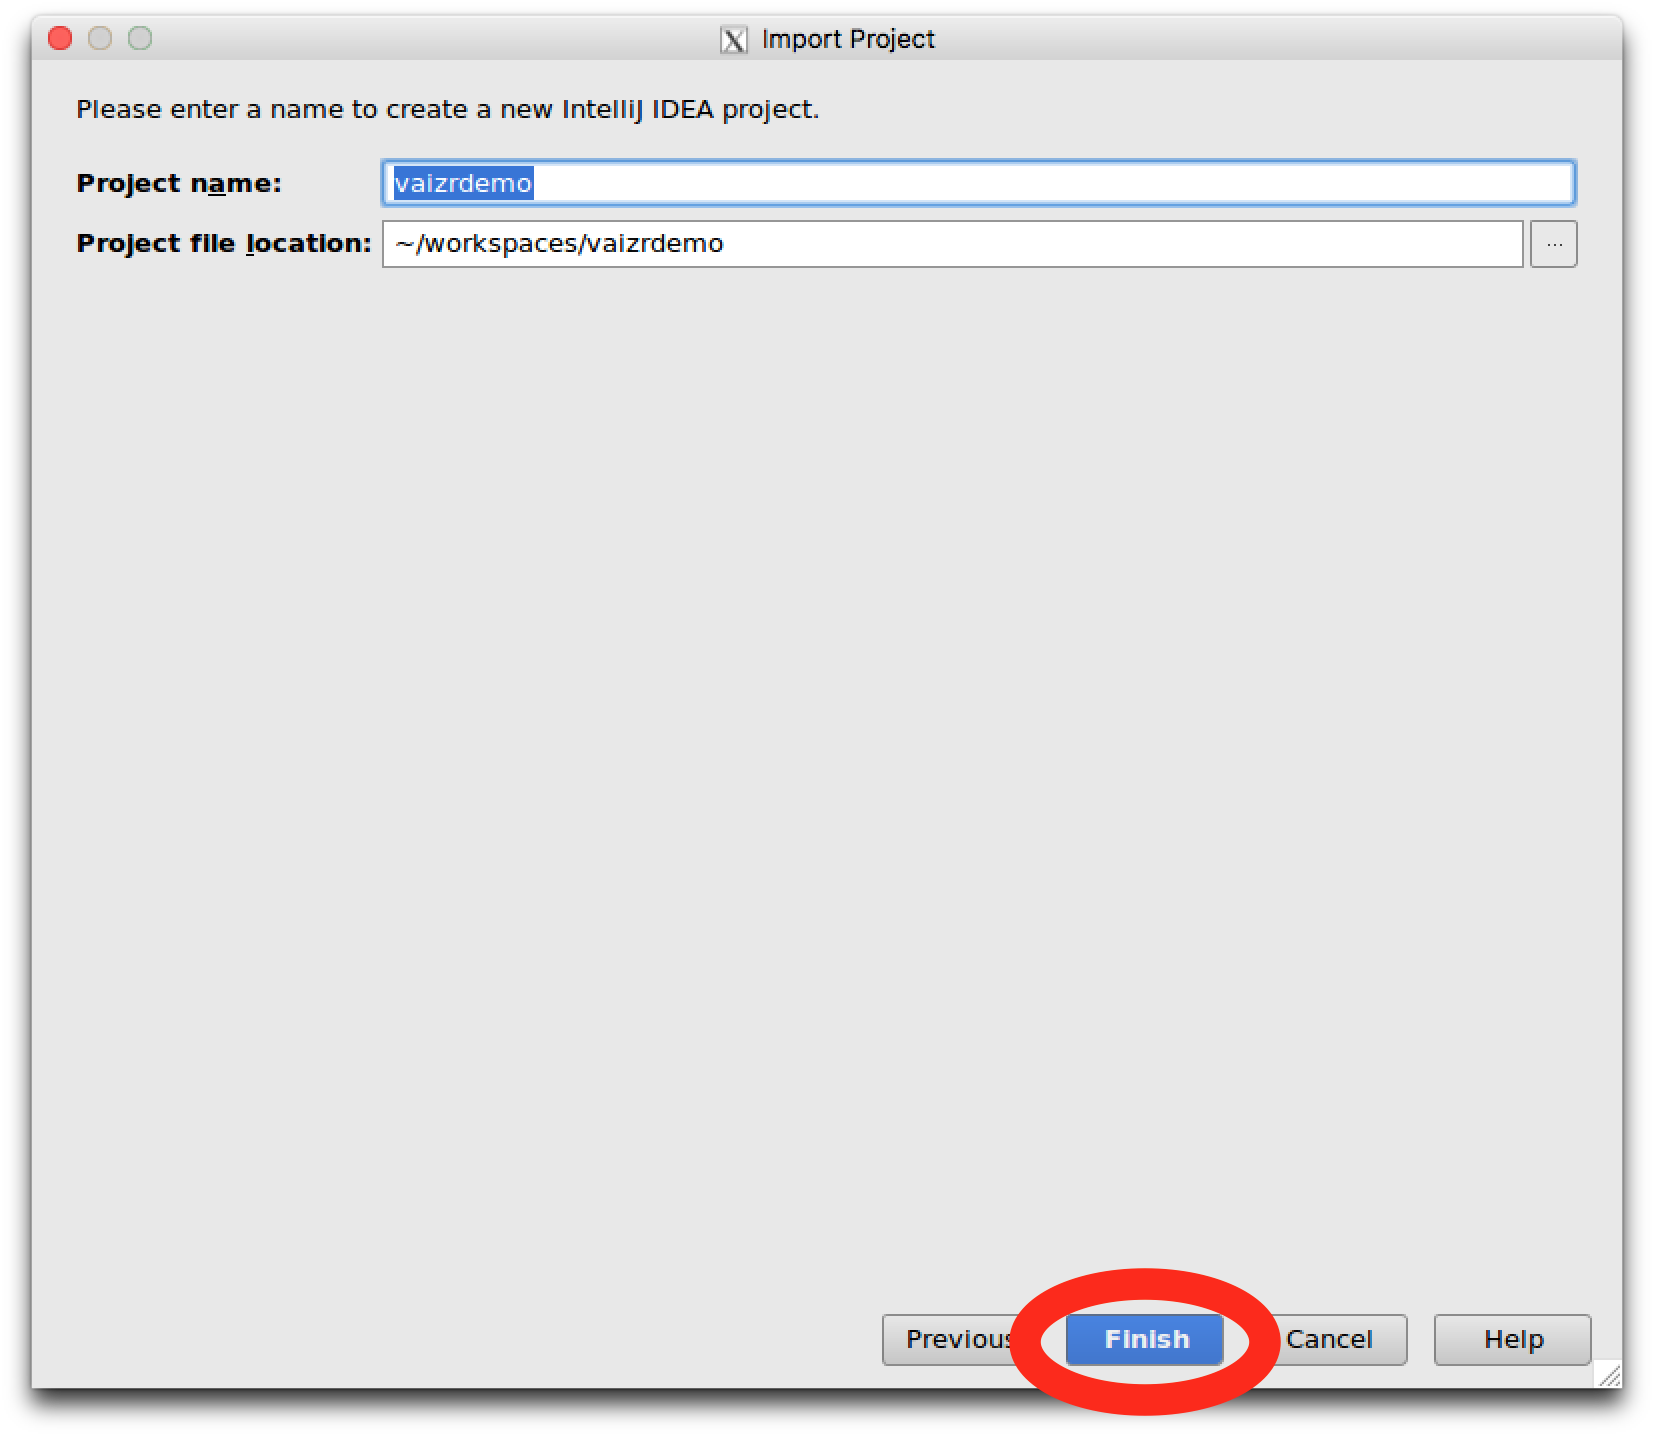 In the Please enter a name to create a new IntelliJ IDEA project. Click
 Finish
 Finally De-Select Show Tips on Startup
And click Close
Once again the above steps you only have to do Once
Now wait till indexing is finished You can see that at the bottom of the screen

You know when indexing is finished when you don't see it anymore

Create the two tables
For this tutorial we have to connect to the database. Implicit we connected to same database in the first tutorial. The credentials for this database are given below:
  username : vaizrdemo
  password : vaizrdemo
  database : vaizrdemo
  portnumber : 5432
There are several ways to connect to the database. Now we use the command line in IntelliJ. For your convenience pgadmin3 is also installed on the vaizrdemobox.
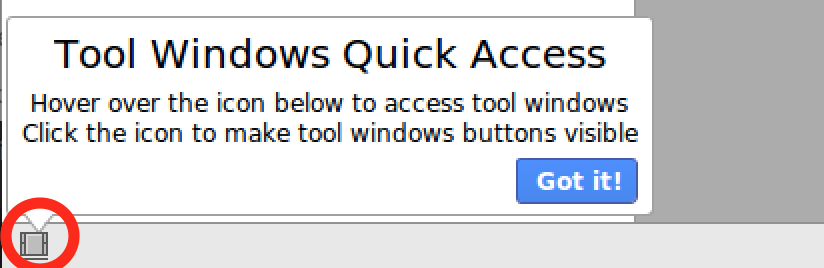 Put your mouse over the little dark square in the bottom left.
And leave your mouse there "hover". This is also indicated by an initial pop-up Tools Windows Quick Access which you can click away.
Put your mouse over the little dark square in the bottom left.
And leave your mouse there "hover". This is also indicated by an initial pop-up Tools Windows Quick Access which you can click away.
After two seconds a menu will come up.
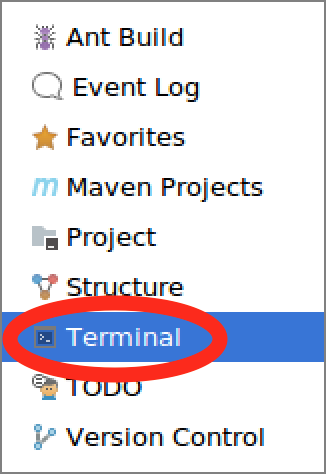
Click here on Terminal
Now a terminal will open.
 Type in the following command
 psql -U vaizrdemo
Please be aware that in this X-terminal IntelliJ the command is most times the CTRL button.
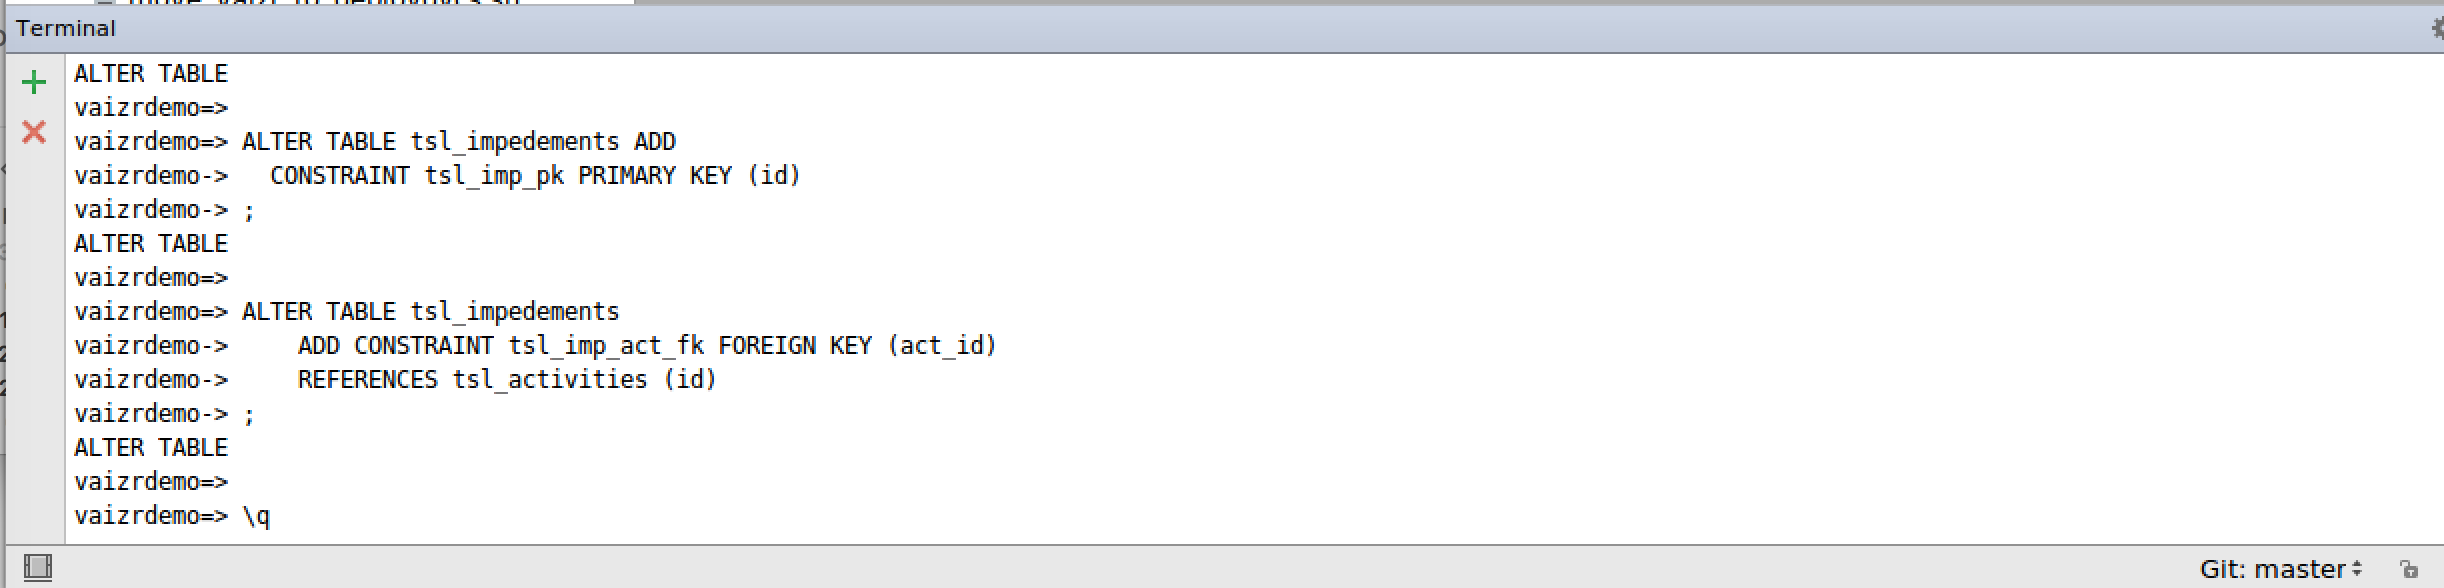
Select the following SQL statements.
Copy the SQL statements.
And paste the SQL statements in the IntelliJ terminal with CTRL V
Create tables SQL script
DROP TABLE if exists tsl_impedements
;
DROP TABLE if exists tsl_activities
;

CREATE TABLE tsl_activities
(
    id serial
,   usr_id integer NOT NULL
,   description character varying(100) NOT NULL
,   creationtime date
)
;

ALTER TABLE tsl_activities
    OWNER to vaizrdemo
;

CREATE TABLE tsl_impedements
(
    id serial
,   act_id integer NOT NULL
,   description character varying(100) NOT NULL
)
;

ALTER TABLE tsl_impedements
    OWNER to vaizrdemo
;

ALTER TABLE tsl_activities ADD
  CONSTRAINT tsl_act_pk PRIMARY KEY (id)
;

ALTER TABLE tsl_activities
    ADD CONSTRAINT tsl_act_usr_fk FOREIGN KEY (usr_id)
    REFERENCES urp_users (id)
;

ALTER TABLE tsl_impedements ADD
  CONSTRAINT tsl_imp_pk PRIMARY KEY (id)
;

ALTER TABLE tsl_impedements
    ADD CONSTRAINT tsl_imp_act_fk FOREIGN KEY (act_id)
    REFERENCES tsl_activities (id)
;
After running the SQL statements. You should see the following screen.
Now we start the real work in the IntelliJ IDEA
Generate Meta Data
 If you open in the left pane the directory tools. You see a sub directory generators
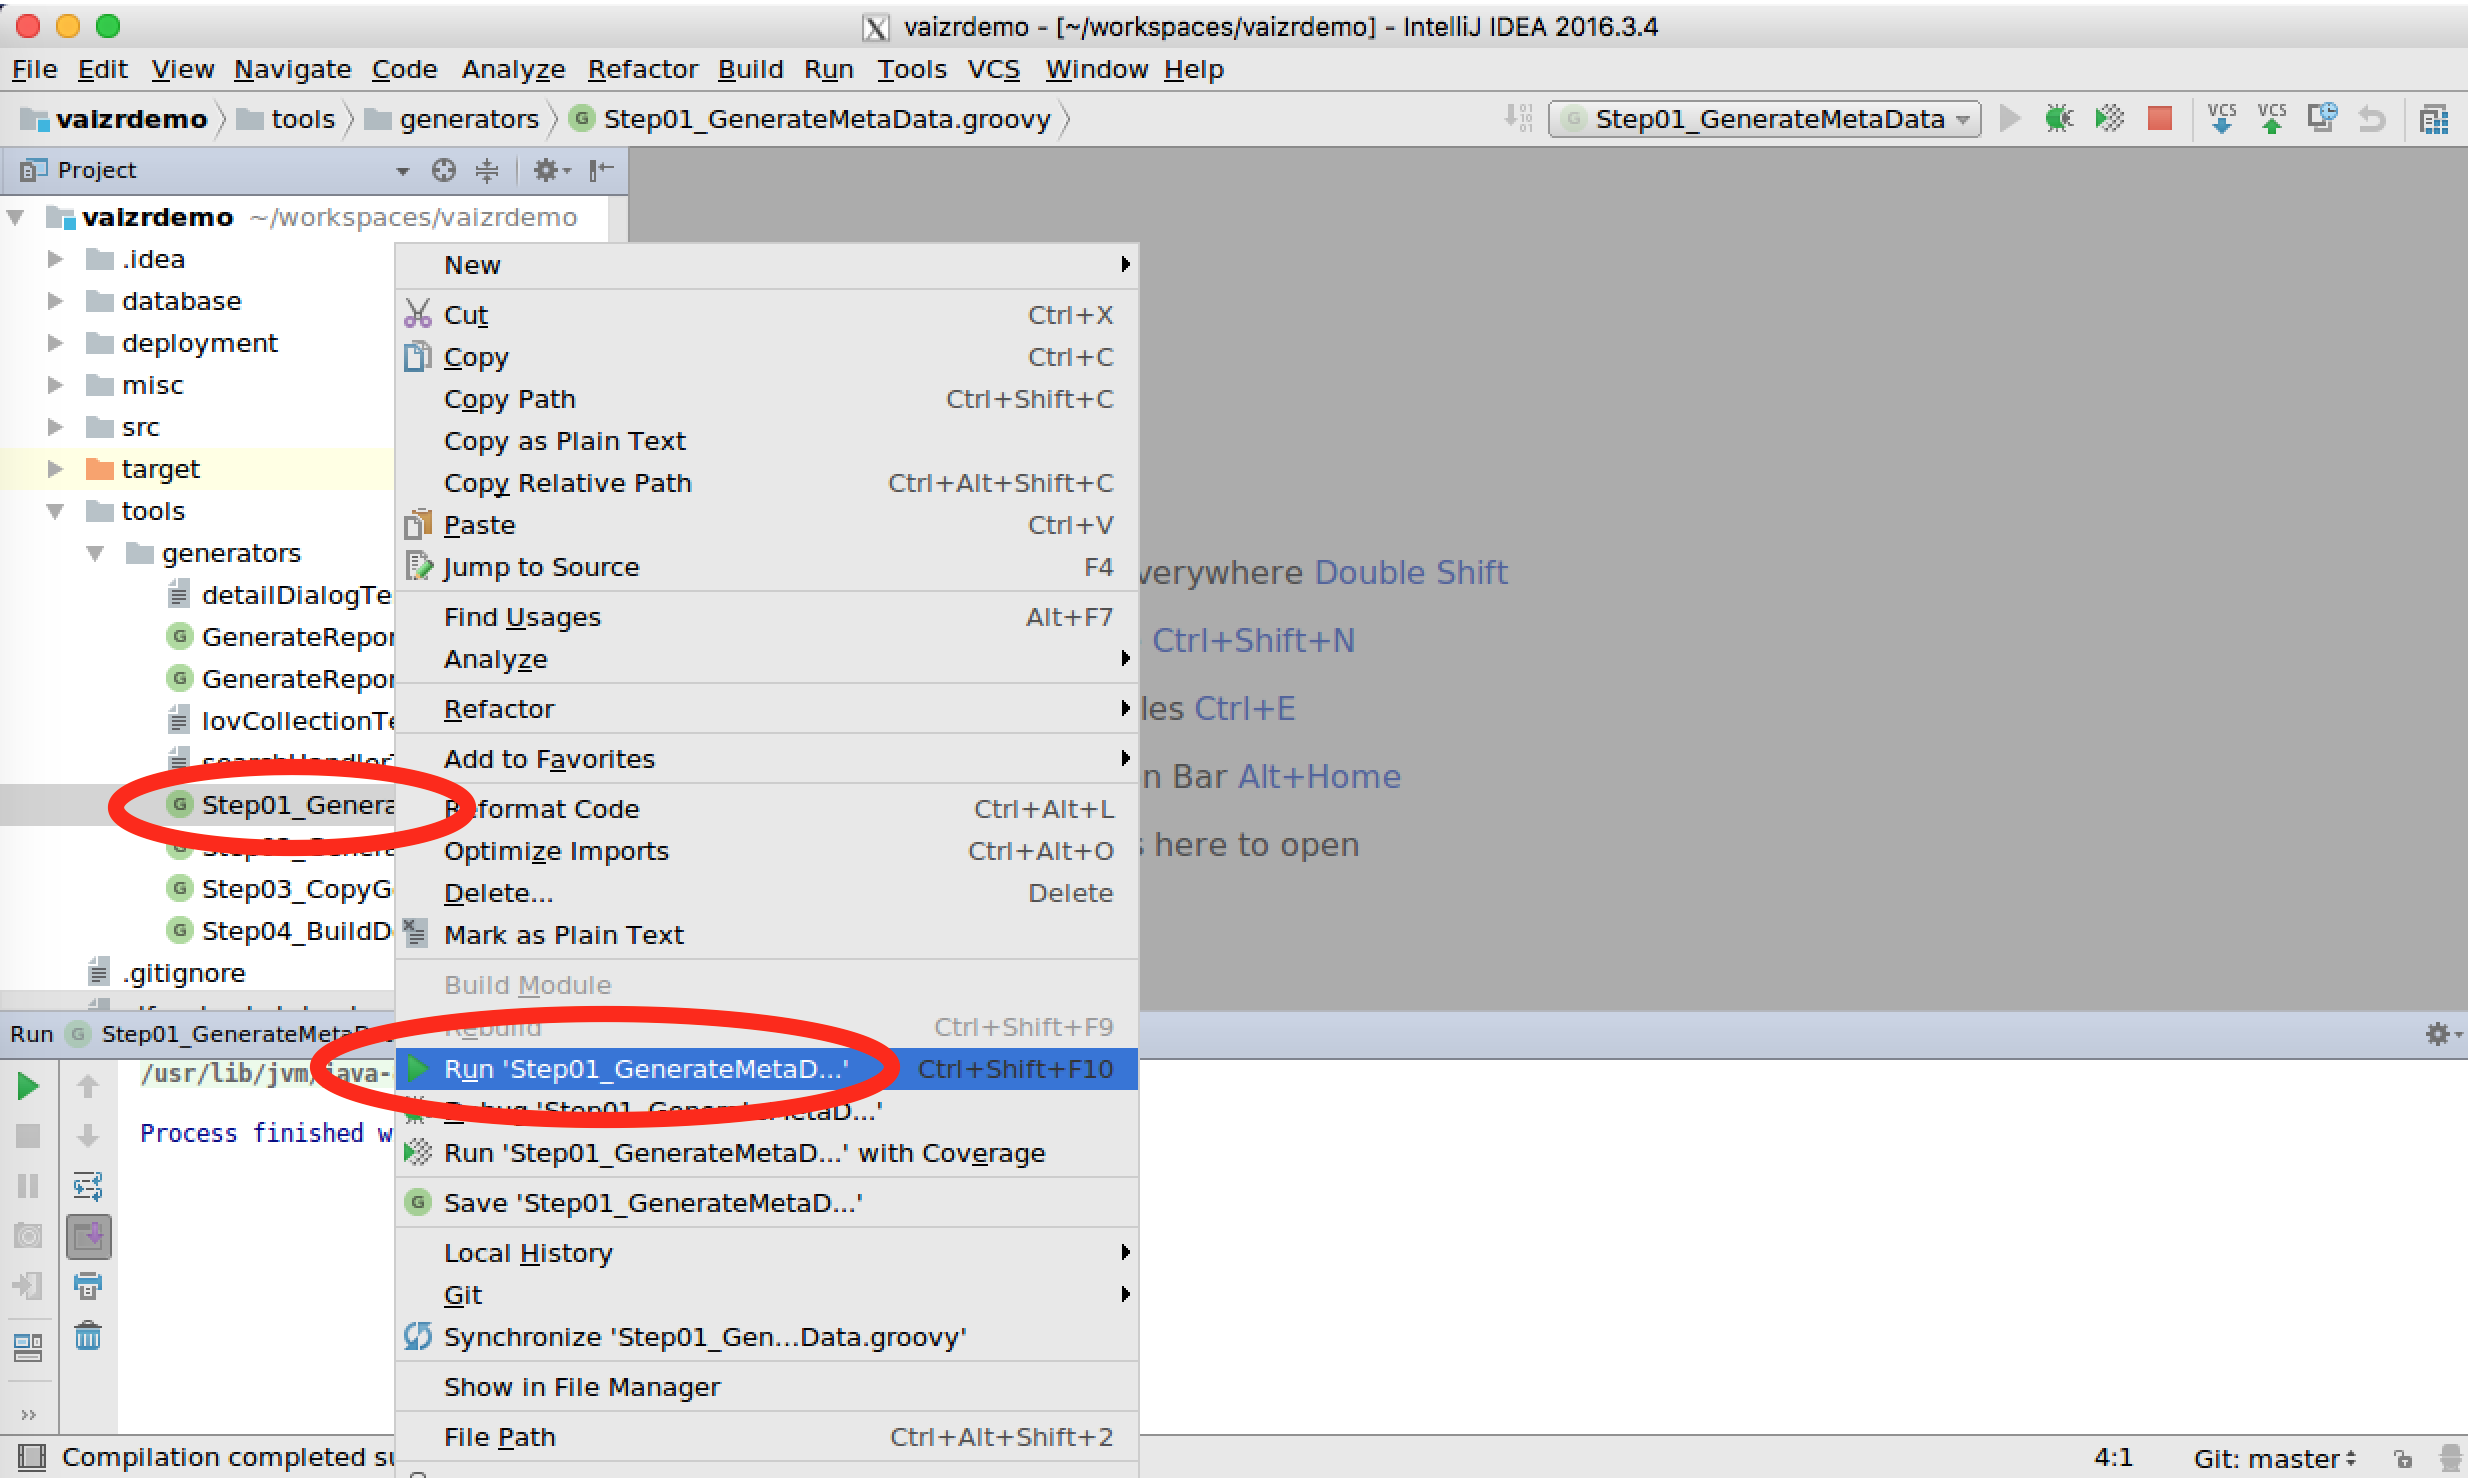
Right mouse click on the Step01_GenerateMetaData.groovy script.
Select Run 'Step01_GenerateMetaData' in the DropDown menu and Click.
After running the Run 'Step01_GenerateMetaData'. You should see the following screen.

Generate Application Files
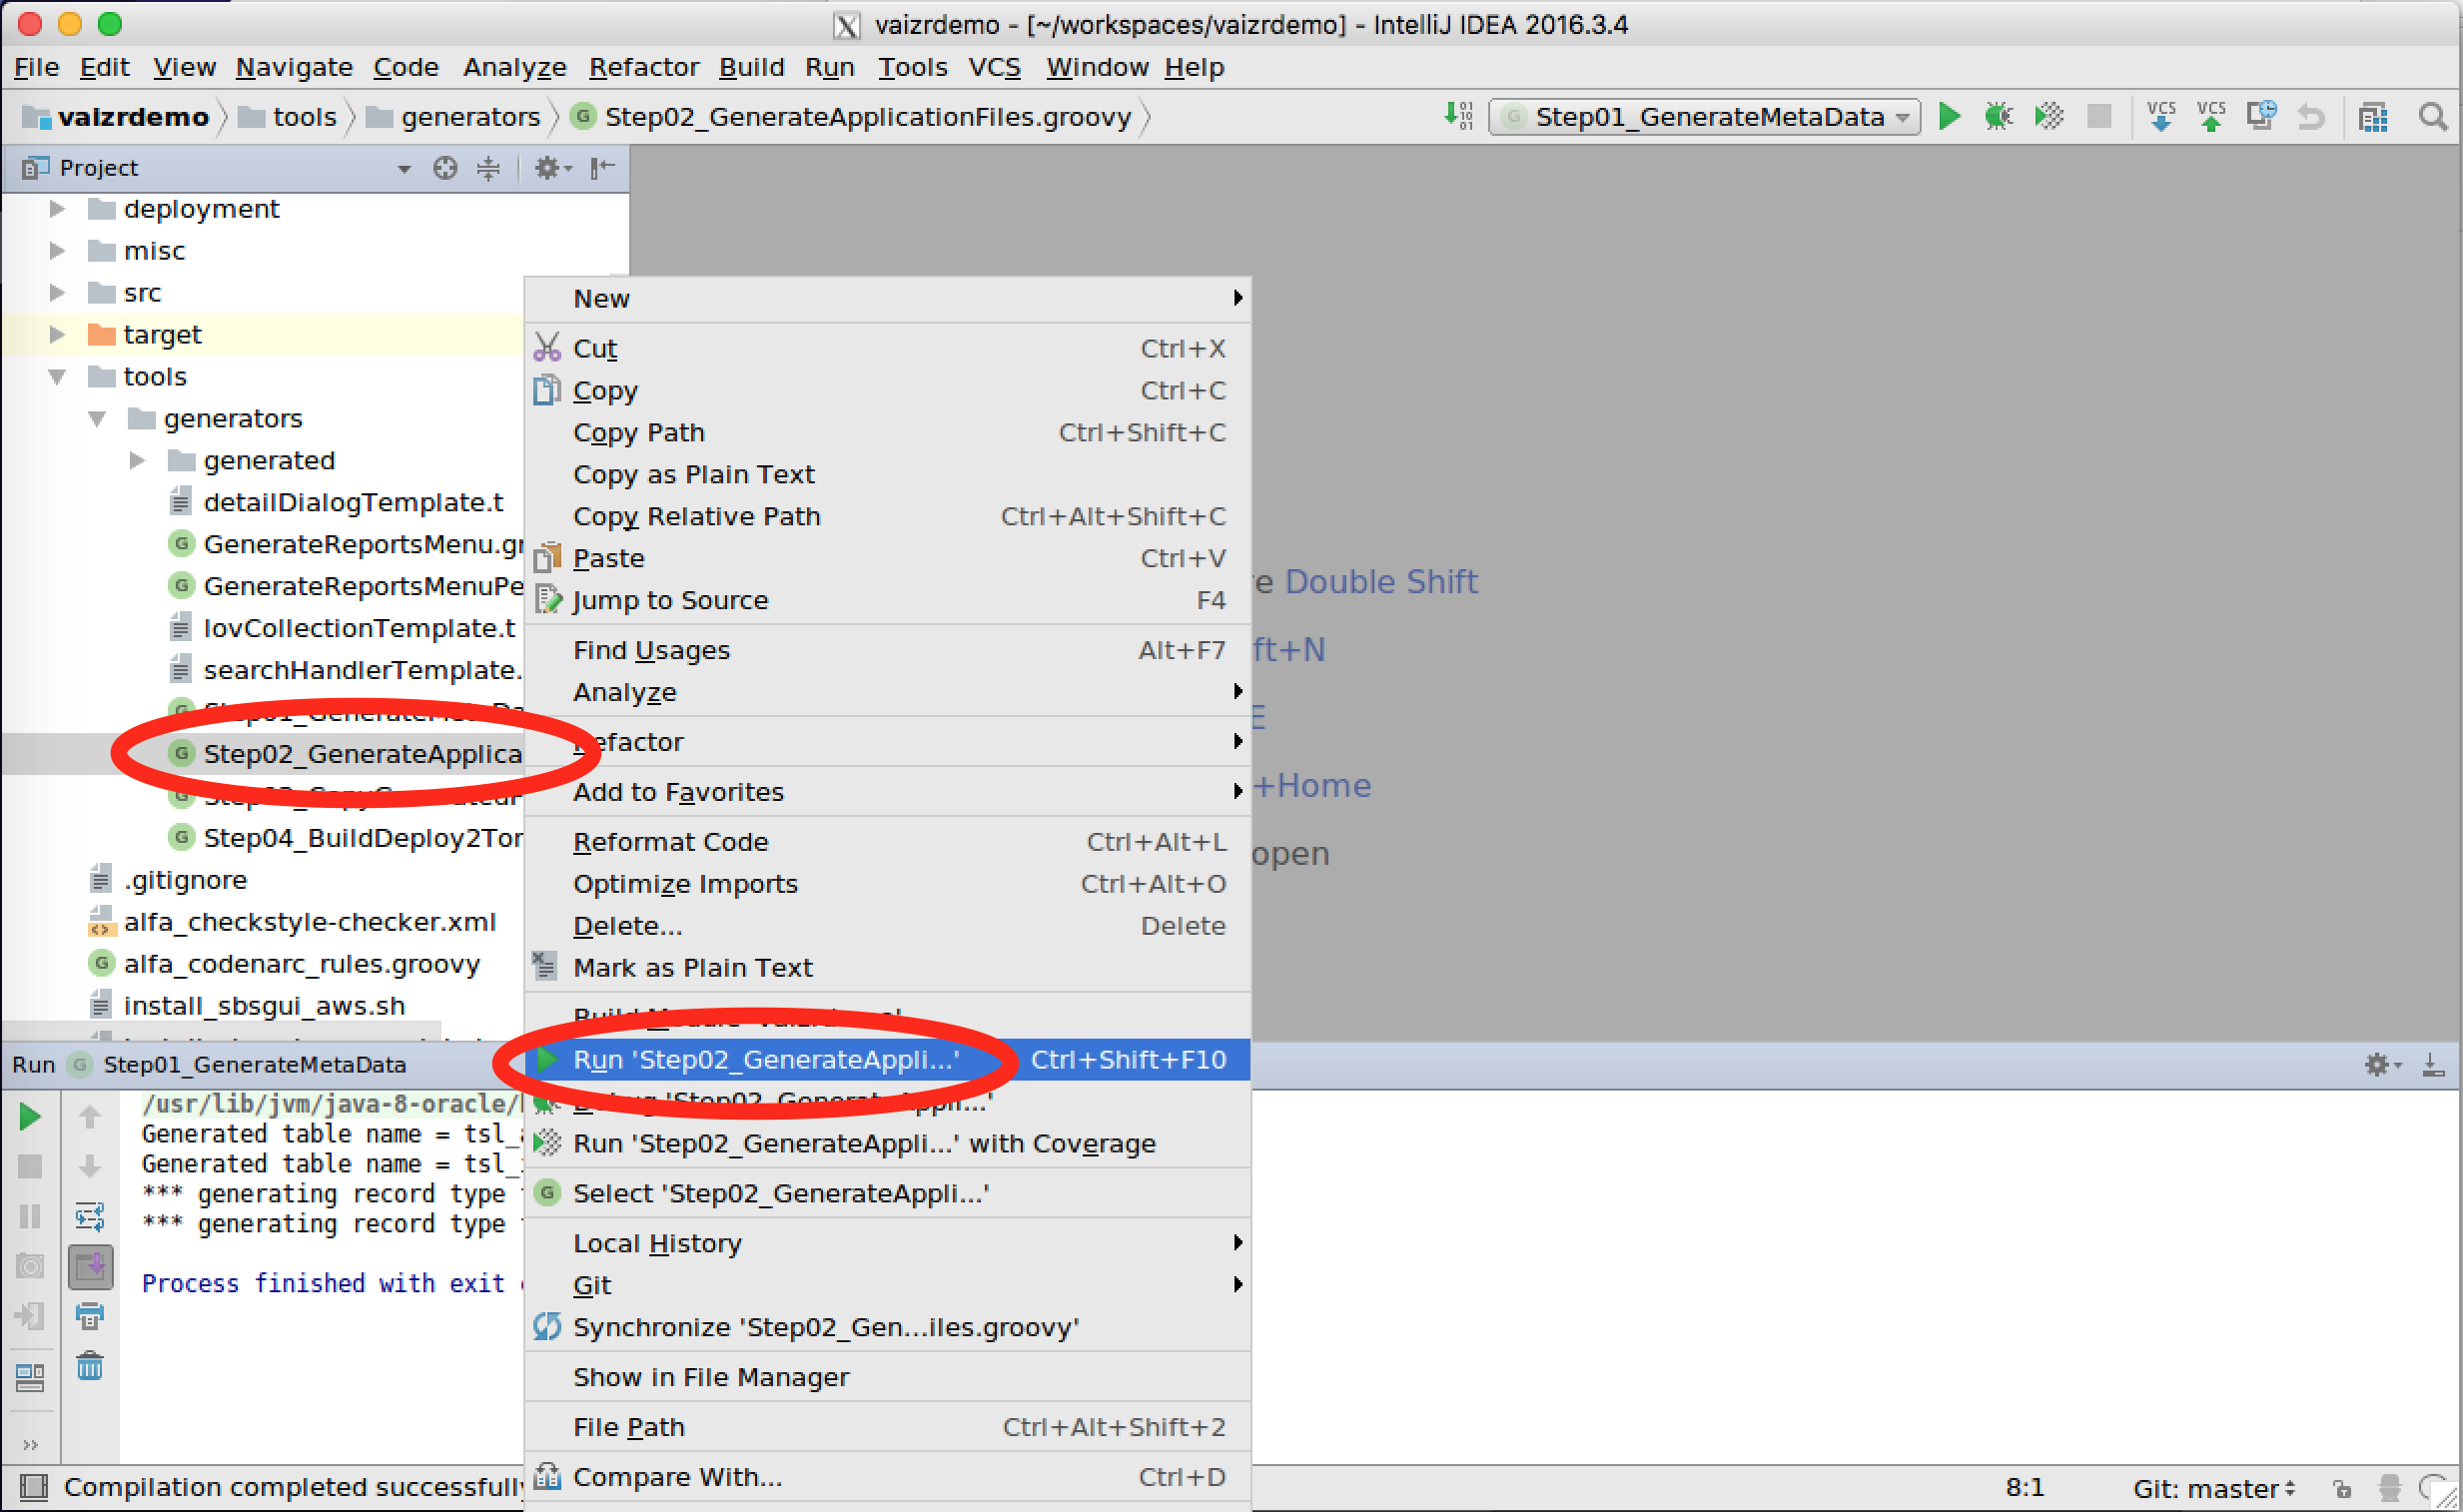 Right mouse click on the Step02_GenerateApplicationFiles.groovy script.
Select Run 'Step02_GenerateApplicationFiles' in the DropDown menu and Click.
After running the Run 'Step02_GenerateApplicationFiles'. You should see the following screen.

Copy Generated Files
 Right mouse click on the Step03_CopyGeneratedFiles.groovy script.
Select Run 'Step03_CopyGeneratedFiles' in the DropDown menu and Click.
After running the Run 'Step03_CopyGeneratedFiles'. You should see the following screen.

Build and Deploy to Tomcat
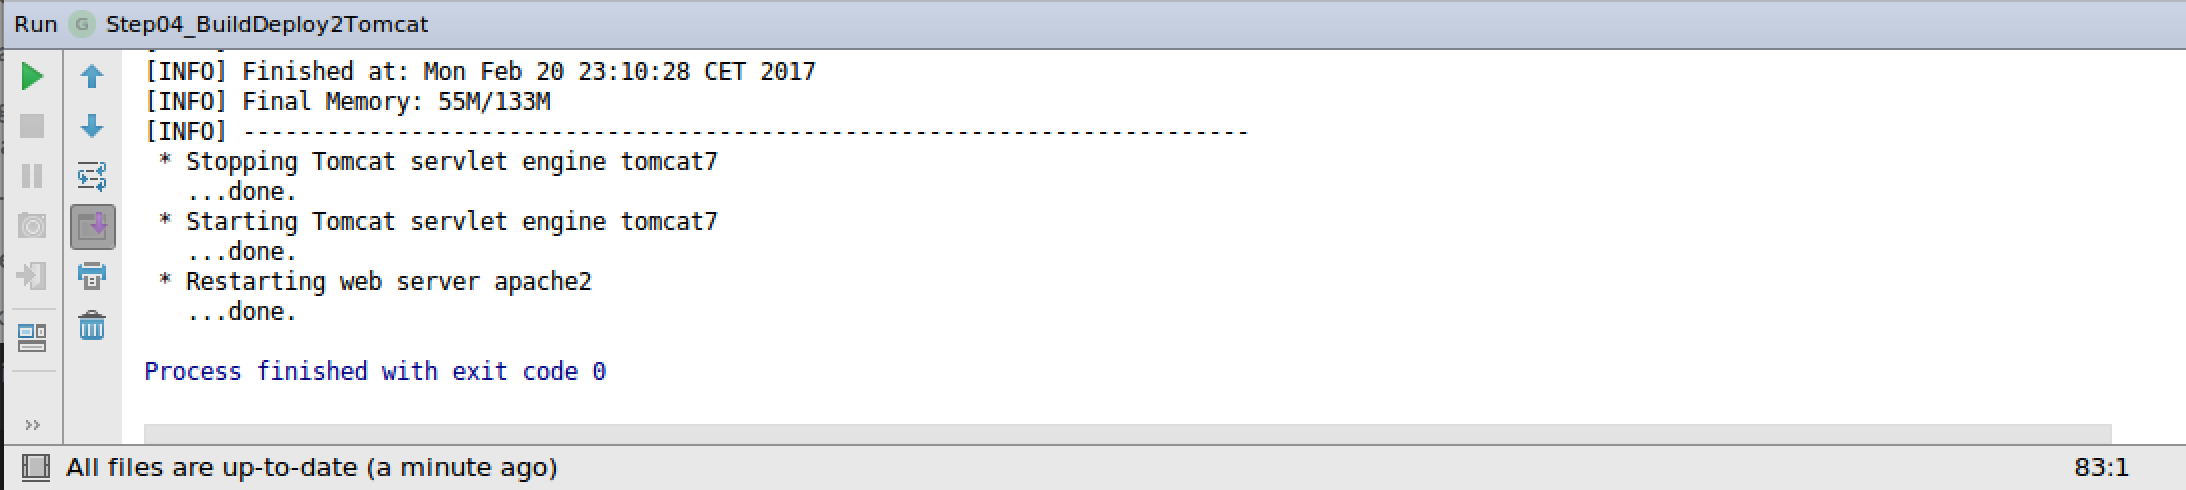
 Right mouse click on the Step04_BuildDeploy2Tomcat.groovy script.
Select Run 'Step04_BuildDeploy2Tomcat' in the DropDown menu and Click.
After running the Run 'Step04_BuildDeploy2Tomcat'. You should see the following screen.
Copy generated menu part into application menu
Our build tasks in IntelliJ are finished and the last couple of tasks will be executed within the Web Interface of the Vaizr Demo Application.
We have to make the new screens accessible in the menu of the Vaizr Application. This step consists of two actions.
1. Add the new screen to the menu.
2. Give permission on menu and screens to the proper role.
First we will have look to the generated menu items. The generated menu can be found in tools\generators\generated\navigation.json If we open this file in IntelliJ we see the following structure.

The names are not yet pretty. The menu items are not encapsulated with a main menu and for permission we only see the splaceholder <fill_in_permission>. For your convienence a prettified menupart is added below:
Prettified Generated Menu part
  ,
  {
    "name": "Master Detail Demo",
    "permission": "masterdetaildemo",
    "id": "thesprintlab_id",
    "items": [
      {
        "name": "Activities",
        "permission": "masterdetaildemo",
        "id": "nav_experimental_tsl_activities_id",
        "fn": "Assai.mainPageHandler.showSearchRecordsTab",
        "parameters": {
          "datasource": null,
          "recordType": "tsl_activities"
        },
        "disabled": false
      },
      {
        "name": "Impedements",
        "permission": "masterdetaildemo",
        "id": "nav_experimental_tsl_impedements_id",
        "fn": "Assai.mainPageHandler.showSearchRecordsTab",
        "parameters": {
          "datasource": null,
          "recordType": "tsl_impedements"
        },
        "disabled": false
      }
    ]
   }
This above menu part you are going to add to the menu of the vaizrdemo application. This you will do in the web application Vaizr itself.
Yuo can start a firefox browser in a separate window.
- host ==> Mac, run command in terminal
- guest ==> Windows, run command in MobaXerm terminal
- host $
. ./firefox - guest $
firefox
You can also run you preferred browser on your own desktop. Simply point to the following url http://localhost:8080/vaizrdemo
You can login with:
username : nanne
password : nanneo

Go in the menu to SBSGui parameters.
Click and go to Multiline parameters.
Click again and in the right pane you see now a Multiline parameters search screen.
Click Search . You now see 5 records.
Double Click on Main Menu, the last record.

After double clicking on Main Menu you should see the following screen.

Scroll to the bottom and hit return before the ] the square closing bracket.
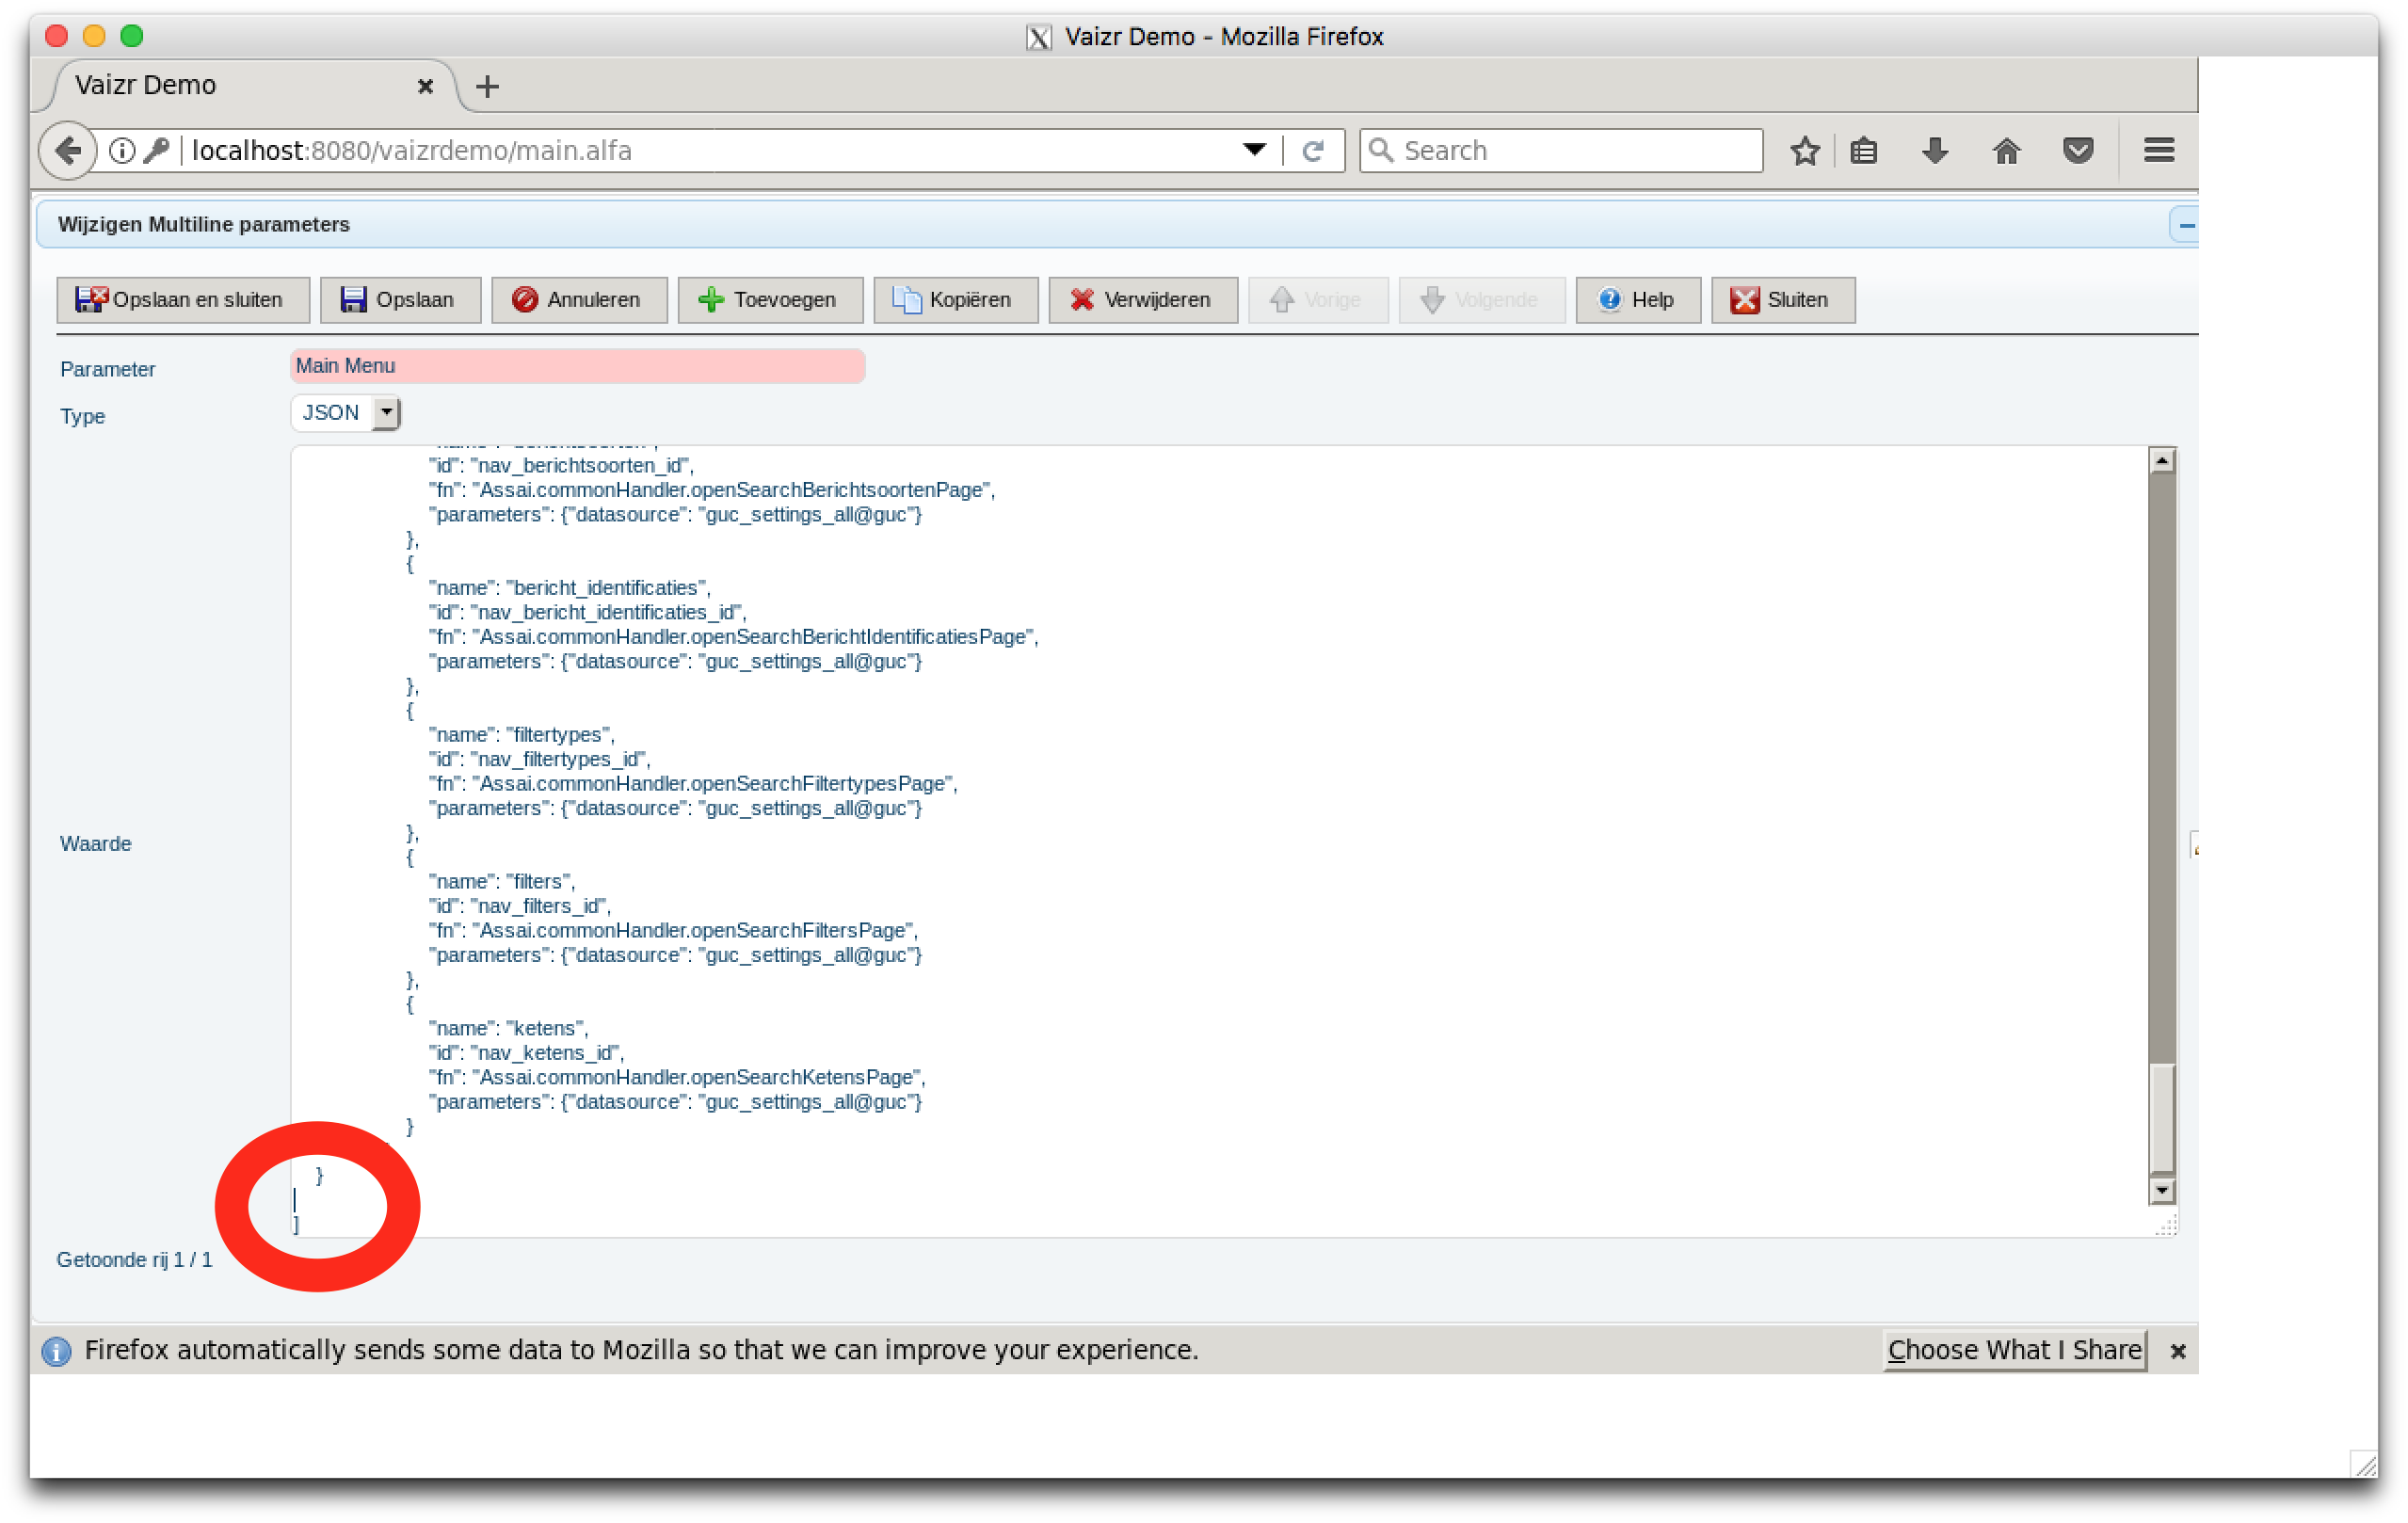 You can see that the
 Save and Undo buttons are activated now.
Copy the following json part just before the square bracket.
  ,
  {
    "name": "Master Detail Demo",
    "permission": "masterdetaildemo",
    "id": "thesprintlab_id",
    "items": [
      {
        "name": "Activities",
        "permission": "masterdetaildemo",
        "id": "nav_experimental_tsl_activities_id",
        "fn": "Assai.mainPageHandler.showSearchRecordsTab",
        "parameters": {
          "datasource": null,
          "recordType": "tsl_activities"
        },
        "disabled": false
      },
      {
        "name": "Impedements",
        "permission": "masterdetaildemo",
        "id": "nav_experimental_tsl_impedements_id",
        "fn": "Assai.mainPageHandler.showSearchRecordsTab",
        "parameters": {
          "datasource": null,
          "recordType": "tsl_impedements"
        },
        "disabled": false
      }
    ]
   }
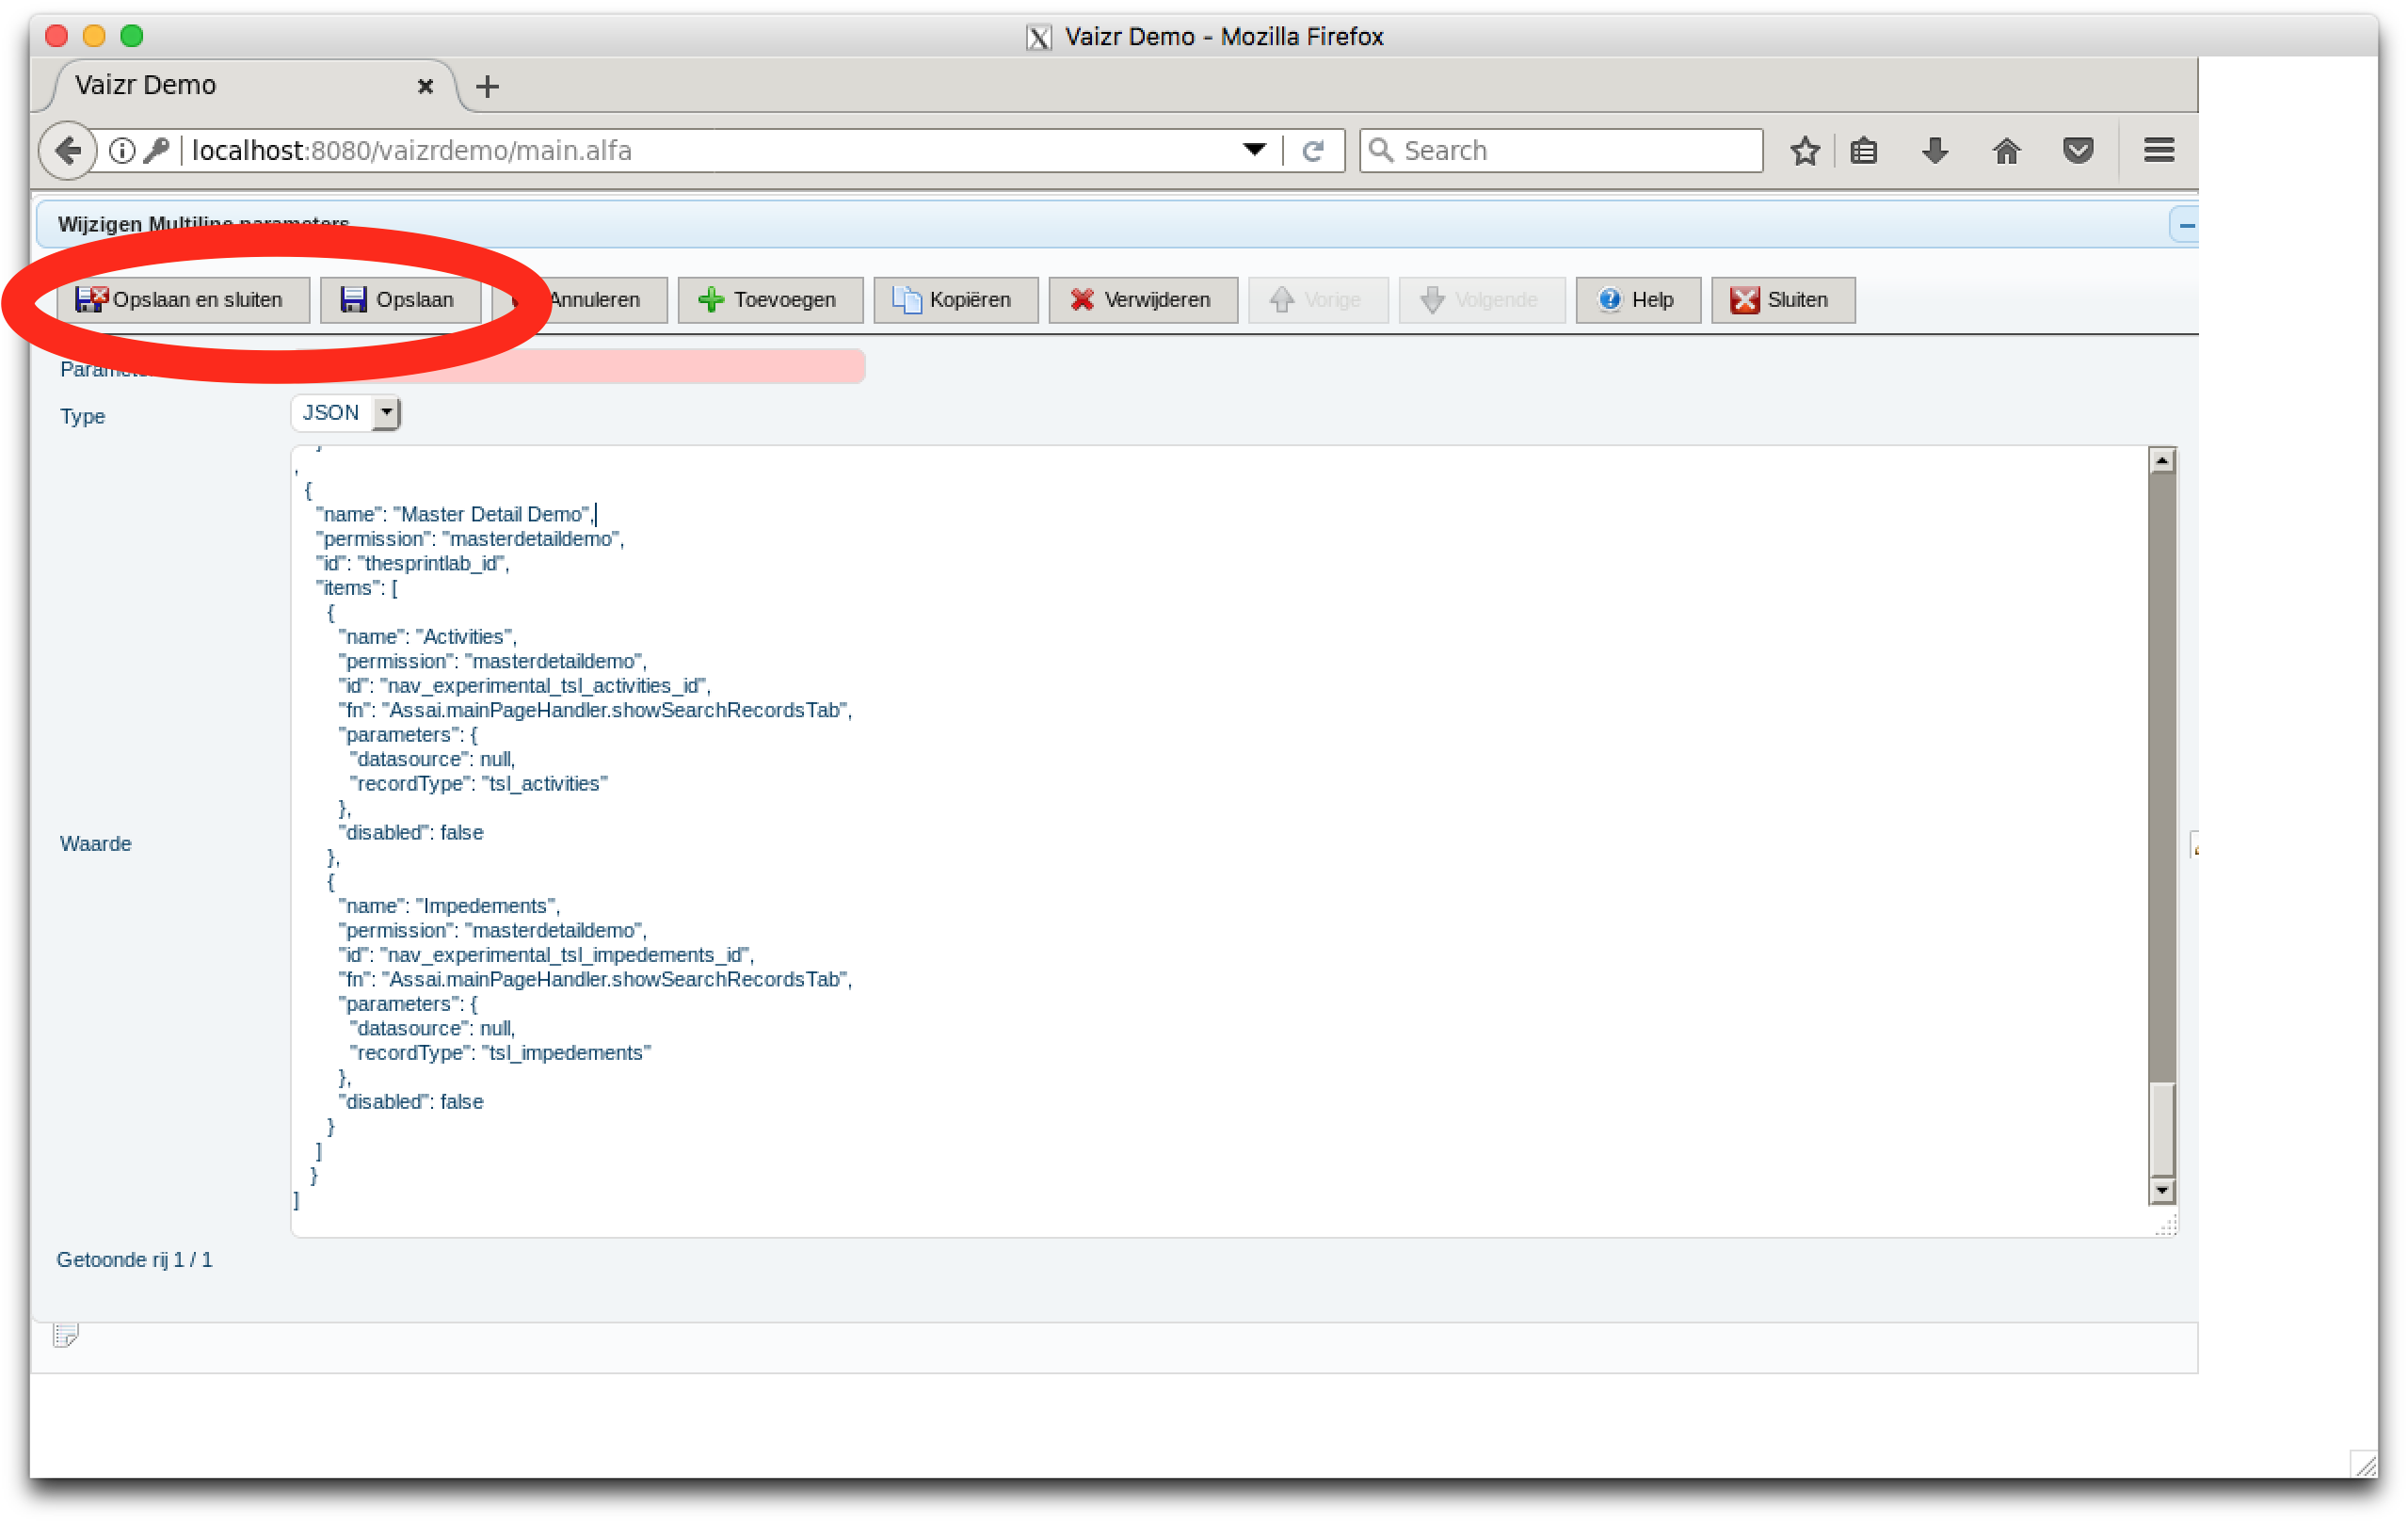 The screen should look like above
Click on
The screen should look like above
Click on Save or click on Save and Close
On the buttons the text is not Save and Close but Opslaan en sluiten. The whole application is multilingual, Vaizr is also deployed in Russia and China and the buttons and all other texts in the application are there translated to those subsequent languages.
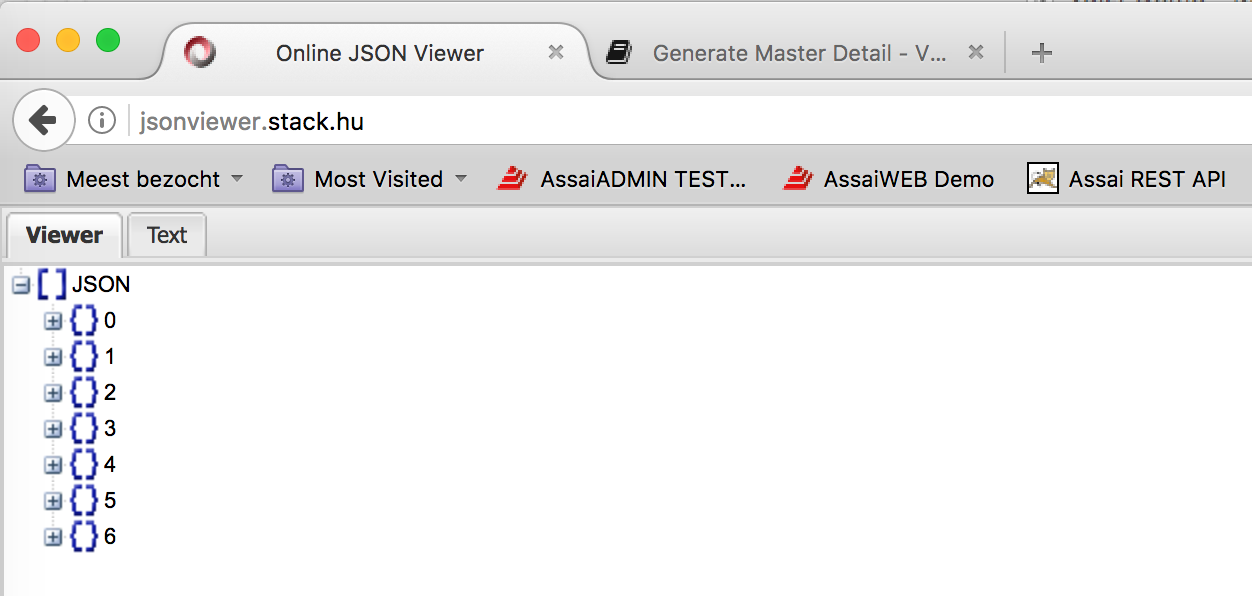
Optional Step, Not Necessary, check the validity of your JSON
You can check and prettify the menu in an online JSON viewer. Just do CTRL A and CTRL C and paste the menu in the JSON viewer. You should see the following in the JSON Viewer. Here you have possibilities to format as well.
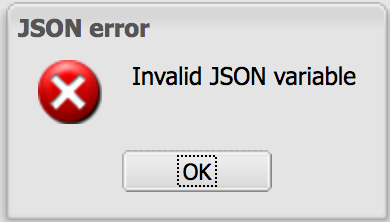
If your JSON is not well formed you get the following error. You have to correct the error before saving the menu.
After saving the menu you can logoff and logon and check if the menu is still functioning. Now the final part. Adding the permission for the new menu.
Give permissions for the added menu
 Open the permissions which can be found in the Users & Permissions section.
Click on Add
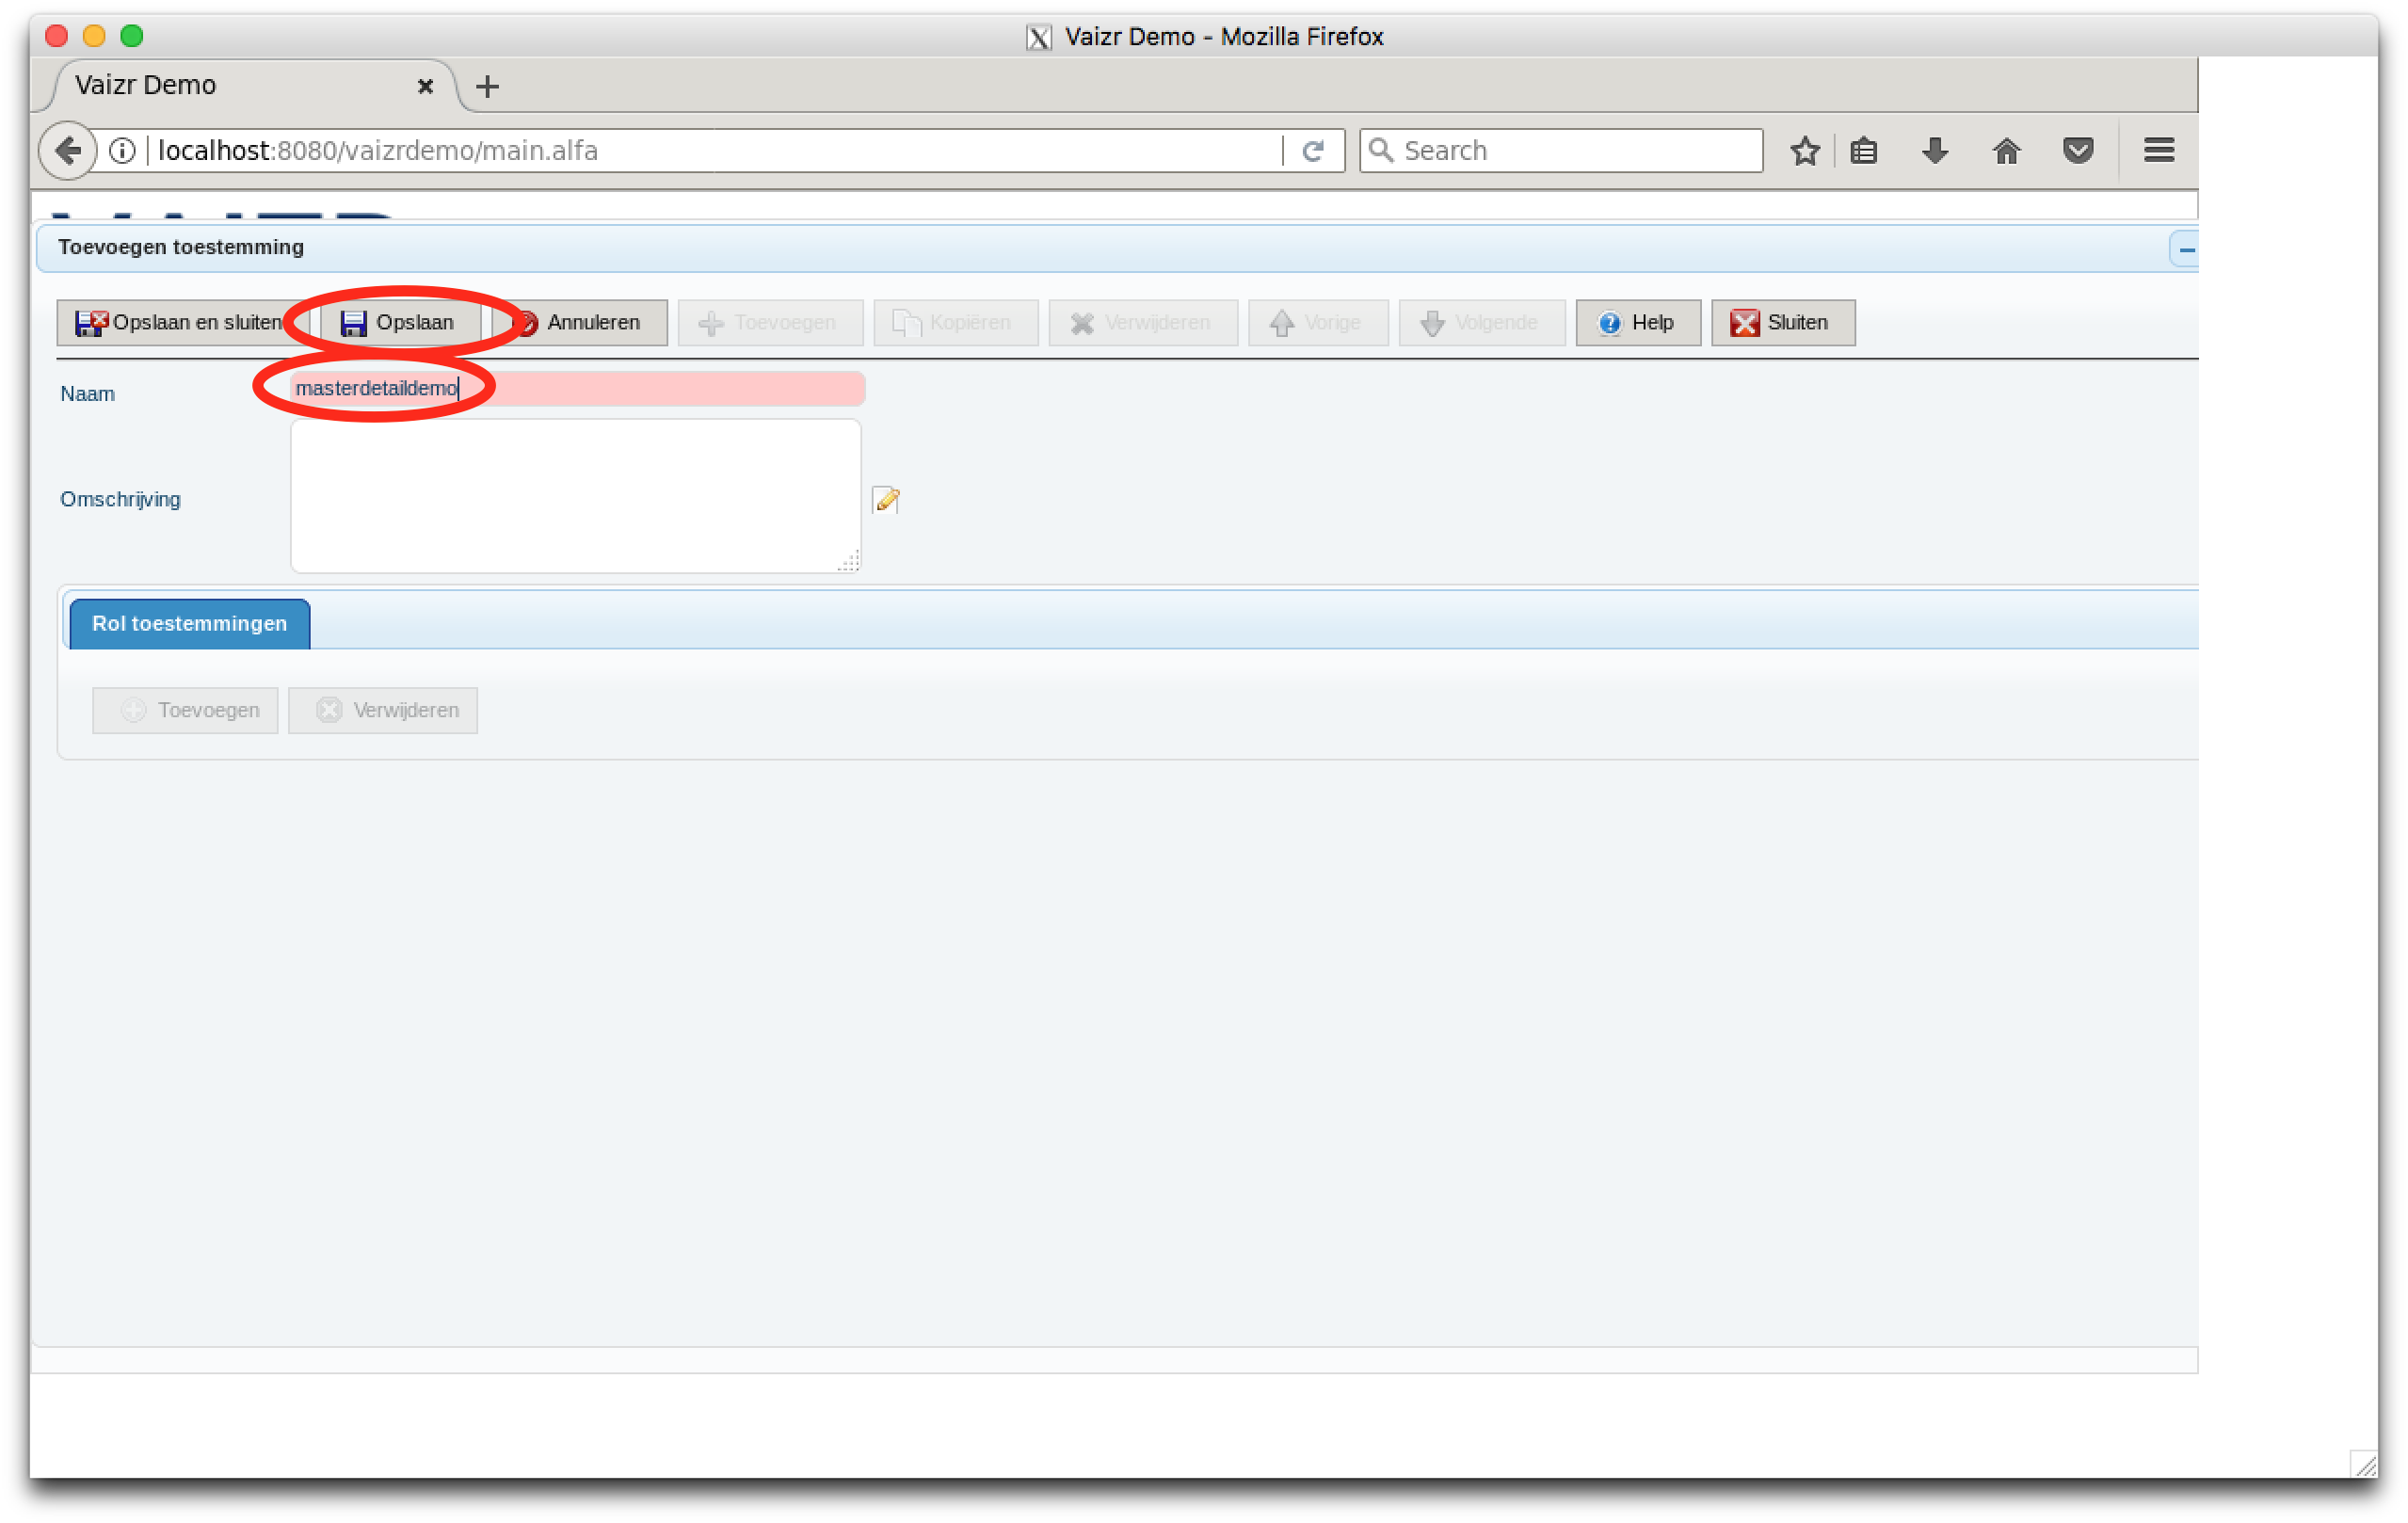 In the permissions add screen we add the masterdetaildemo permission.
Fill in masterdetaildemo and click Save.
 The
The Add button in the role permission sub part is active now.
Click on the activated Add button in the role permission sub part.
 Next we are adding the role SuperAdmin. Just type
 s in the field.
Click on SuperAdmin which appears on the screen.
Click on Save or Save and Close.
Close the open windows.
 After saving and closing the windows we log off and log on again to check our work.
Check the result
If you see the following screen you succeeded in generating some simple screen.
